Last updated: August 14, 2026
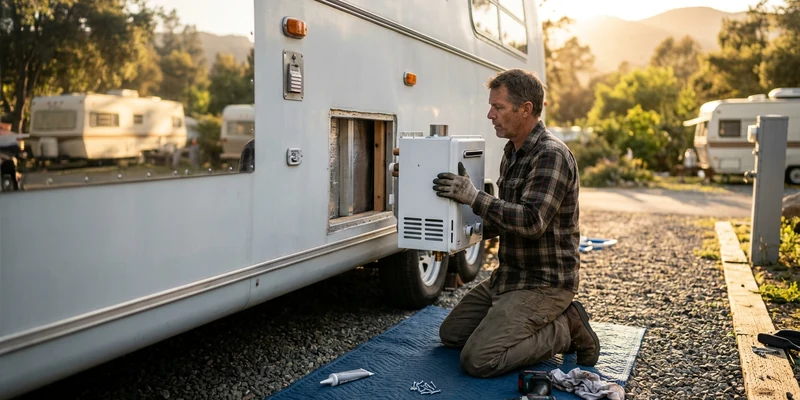
RV tankless water heater installation is a split job, and being honest about the split is the whole point of this article. Measuring the opening, removing the old unit, sizing and running the water lines, mounting and sealing the new one, and the 12 volt supply are all things a careful owner can do. The propane connection and anything on the 120 volt side are not, and that is not a legal formality we are hiding behind. A gas joint that passes a visual inspection and still leaks is a thing that happens, and the way you find out is a smell in the night or an alarm that goes off while you are asleep in the vehicle.
So this guide is written the way the job actually runs: what you decide before you order, what you can do with your own tools, exactly where you stop, and what to hand over. Owners who plan it this way commonly pay a technician for an hour of gas connection and leak testing rather than for a full day of installation, which is the sensible middle ground between doing it all and doing none of it.
This article contains affiliate links. If you buy through them, we may earn a commission at no extra cost to you. Learn more.
Quick Answer
Can you install an RV tankless water heater yourself?
- Partly. The preparation, measuring and adapting the wall opening, removing the old heater, the water lines, mounting, sealing, and the 12 volt supply are owner level work with normal care.
- The propane connection, the leak test, the combustion check, and any 120 volt wiring on an electric or hybrid unit are jobs for a certified RV technician. We do not publish instructions for them.
- Start with the opening. Fitment decides which units are realistic long before flow rating or brand does, so measure height, width, and depth before you shop.
Who Does What on This Job
Read this table before anything else. It is the plan for the whole installation, and it is what you should agree with your technician when you book the gas connection.
| Task | Who does it | Why |
|---|---|---|
| Measuring the opening and choosing the unit | You | Fitment decides everything else, and you have the tape measure |
| Shutting off gas, power, and water | You | Standard isolation before any work begins |
| Removing the old heater | You, up to the gas connection | Screws, water lines, and 12 volt are yours, the gas union is not |
| Disconnecting and capping the gas line | Certified RV technician | It has to be capped, tested, and left safe |
| Adapting the wall opening | You | Cutting, framing, and trim are carpentry, not gas work |
| Mounting and sealing the unit | You | Butyl tape and lap sealant, done properly and checked |
| Water lines and fittings | You | Water side work, a leak announces itself harmlessly |
| 12 volt supply and fuse | You | Low voltage work with the battery disconnected |
| Connecting the propane line | Certified RV technician | Needs proper joints, sealant, and instrument leak testing |
| Leak test and first fire | Certified RV technician | Combustion has to be verified, not assumed |
| 120 volt wiring on electric or hybrid units | Certified technician or licensed electrician | Shore power wiring and breaker work is not a driveway job |
| Commissioning the water side | You | Purge air, check joints, set temperature |
If you are still deciding whether to make the switch at all, read tankless versus tank first, and if your existing heater is misbehaving rather than dead, RV water heater not working may save you the project entirely.
Start With the Opening, Not the Brand
Fitment is the constraint that eliminates most of the market before you have compared a single feature. Take four measurements and write them down: the height and width of the existing exterior opening, the depth available behind it, and the position of the framing around it. Then look at where the water lines and the gas line arrive, and how much slack they have.
Replacing a conventional tank heater almost always means the openings do not match, because tank heaters and tankless units are shaped differently. Some tankless models are designed specifically to drop into a common tank heater opening, which is the easiest possible swap. Others need the opening enlarged or reduced, which means cutting and framing, and some are sold with a trim ring or adapter panel that covers a mismatch tidily.
What to check besides the hole
Look at what is behind the wall. A structural member, a slide mechanism, a wiring run, or a tank in the way changes the plan entirely, and finding it after you have cut is a bad afternoon. Check the exterior surroundings too, since manufacturers and code both specify clearances from windows, vents, doors, and the propane fill point. Those distances are model specific and are exactly the sort of thing your technician should confirm before you commit to a location.
Choosing the Unit
Once fitment narrows the field, three things decide the rest. Flow rating, which determines how many fixtures you can run at once and how well the unit copes with cold incoming water. Fuel, meaning propane, electric, or a hybrid design, which depends on how you camp and how much shore power you have. And control, meaning whether you get a simple temperature dial or a proper set point with a display inside.
Propane units are the default for anyone who spends time away from hookups, since they need only 12 volts and gas. Electric units suit rigs that live on shore power and avoid the venting question entirely, at the cost of needing serious amperage. Our comparisons cover both: best RV tankless water heaters overall, plus propane models and electric models separately. For brand level detail, see the Fogatti review, the Girard review, and the Truma and Camplux comparison.
🔥 The unit itself
A propane RV tankless water heater sized to your wall opening, with on demand ignition, an adjustable temperature setting, and a flow rating that matches how many fixtures you actually run at once. Measure the opening height, width, and depth before ordering, and confirm whether the model is designed to fit a standard tank heater cutout or needs the opening modified.

The Owner Side of the Job
Here is the part you do, in order. Nothing in this section touches a gas component, and if a step starts to, you have wandered off the plan.
Isolate and remove
Close the propane cylinder valve. Switch the water heater off and disconnect the negative battery cable or pull the heater’s fuse. Shut off the water, open a hot tap to release pressure, and let the old unit cool completely. Never open a water heater that is hot or under pressure. Drain the old heater, disconnect its water lines and its 12 volt wiring, photograph everything before you undo it, and remove the mounting screws. Then stop, because the gas line is the last connection and it is not yours to break.
Prepare the opening
With the old unit out and the gas line safely capped by your technician, adapt the opening. Cut carefully, support the framing properly, and seal any exposed edges of the wall skin. Dry fit the new unit before you commit to sealant, and check that the flange sits flat against the sidewall with no rocking, because a flange under tension is a flange that leaks later.
Mount and seal
Bed the flange on butyl tape rather than relying on sealant alone, fit the screws evenly without crushing the tape, then run self leveling or non sag lap sealant over the perimeter and the screw heads depending on the surface. This is the joint that decides whether your sidewall stays dry for the next ten years, and it deserves more patience than the rest of the job put together. Check it after the first rain, and again at the start of every season.
Water lines
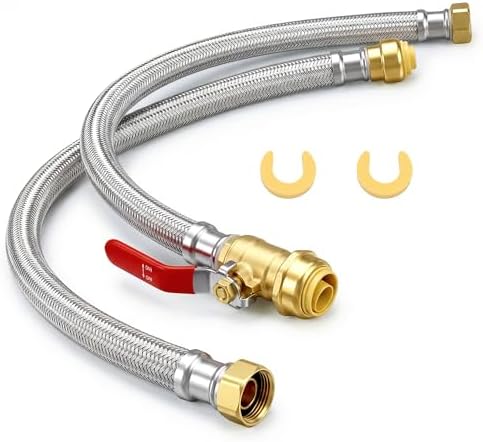
Connect cold to the inlet and hot to the outlet, respecting the markings on the unit, since a tankless heater plumbed backward will not work and can be damaged. Use flexible connectors at the unit where you can, so vibration on the road does not fatigue a rigid joint. Fit service valves now if your budget allows, because they make every future descaling flush a twenty minute job instead of an afternoon, as covered in how to descale an RV tankless water heater.
The 12 volt supply
Follow the manufacturer’s wire gauge and fuse rating rather than reusing whatever was there. Tankless units are sensitive to voltage drop during ignition, so undersized wire or a marginal ground causes intermittent lockouts that look like a faulty appliance for years afterward. Make the ground connection to clean bare metal, protect the run from chafe where it passes through anything, and fuse it at the source. Reconnect the battery only when everything else is done.
🔗 The plumbing side
Flexible water heater connector hoses plus the fittings and thread sealant to match your unit’s inlet and outlet, so vibration does not work a rigid joint loose on the road. Confirm the thread type and size on your specific unit before ordering, since RV connections vary and adapters are cheaper to buy than to improvise at the campsite.
🛡️ The seal that protects the sidewall
Butyl tape for bedding the flange, plus RV lap sealant for the perimeter and screw heads. Buy the sealant type that suits your surface, self leveling for horizontal, non sag for vertical, and do not substitute household silicone, which does not bond reliably to RV sidewalls and makes future resealing harder.

The Part That Is Not Yours
This is the section to show anyone who tells you the gas connection is just a flare fitting and a wrench. It is a fitting, yes, and it is also the difference between a hot shower and a carbon monoxide incident inside a sealed box you sleep in.
We do not publish instructions for any of the following: connecting or disconnecting gas lines, capping a line, gas fittings and unions, regulators, gas valves, burner tubes, orifices, burner adjustment, flame sensor or thermocouple adjustment, or the pressure and leak testing that has to follow. Nor do we cover 120 volt wiring, converter changes, or breaker work for electric and hybrid units. These need instruments, procedure, and someone who does them regularly.
What to ask your technician to do
Book them for the gas connection, a full leak test of the joint and the surrounding line, a first fire with a combustion check, and confirmation that the vent location meets the manufacturer’s clearance requirements. Ask them to check the regulator and system pressure while they are there, since a marginal regulator shows up as an appliance that lights poorly and gets blamed on the new heater. Have the unit mounted, plumbed, and wired before they arrive, and the visit stays short.
Stop immediately if
You smell gas at any point, a carbon monoxide alarm sounds, you see soot or scorch marks around the vent, or a visible flame is yellow and lazy rather than stable and blue. Shut the appliance off, close the cylinder valve, get everyone out, ventilate, and call a certified technician. Every rig with a combustion appliance needs a working propane and carbon monoxide alarm, and the sensor expires on a date printed on the back regardless of how fresh the battery is. Replace an undated or expired one before you commission a new heater.
🚨 Fit this before the first fire
A combination propane and carbon monoxide alarm rated for RV use, mounted per the maker’s instructions. Check the manufacture and expiry date on any alarm already in the rig, because it ages out on a fixed schedule whatever the battery reads. This is the cheapest item in the whole project and the only one that is genuinely not optional.

Commissioning the Water Side
Once the gas side has been connected and tested, the rest is yours again. Restore water first and pressurize the system with the heater cold, then check every joint, including the ones you were sure about. Run a hot tap until the flow is steady and free of air, because a new installation always holds air and a tankless unit dislikes it.
Then set the temperature conservatively and work up rather than down, and get used to how the unit behaves at low flow, since most models will not fire below a minimum flow rate and a barely open sink tap can sit under it. Check every joint again the next morning, since slow leaks reveal themselves overnight, and check the exterior seal after the first heavy rain. From there, the routine is in RV tankless water heater maintenance, and the fall job is genuinely different from a tank heater, so read winterizing an RV tankless water heater before your first cold season.
Common Mistakes to Avoid
- Ordering before measuring. Fitment eliminates most of the market, and returning a wall mounted appliance is a chore.
- Cutting before checking what is behind the wall. Structure, wiring, and tanks all hide there.
- Plumbing inlet and outlet backward. The unit will not work and may be damaged. The markings are there for a reason.
- Reusing the old 12 volt wiring because it fit. Voltage drop during ignition is the single most misdiagnosed tankless fault, and it starts here.
- Relying on sealant instead of butyl tape. The tape is the seal, the sealant is the weather layer.
- Doing the gas joint yourself because it looks simple. The joint is simple. Proving it is not leaking is not.
- Skipping the water pump question. If your pump could barely keep the old heater happy, a tankless unit with a minimum flow threshold will expose it immediately. See the best RV water pumps if yours is tired.
Frequently Asked Questions
Can I install an RV tankless water heater myself? You can do the measuring, removal, opening, mounting, sealing, water lines, and 12 volt supply. The propane connection, leak test, first fire, and any 120 volt wiring should be done by a certified RV technician.
Will a tankless unit fit my existing water heater opening? Sometimes. Some models are designed to drop into a common tank heater cutout, others need the opening modified or use a trim adapter. Measure height, width, and depth, and check what is behind the wall before ordering.
How long does the installation take? Owners commonly report a day for the preparation, mounting, plumbing, and wiring, plus a separate technician visit of an hour or so for the gas connection and testing. Opening modifications add the most time.
Do I need a bigger water pump for a tankless heater? Possibly. Tankless units need a minimum flow before they fire, so a tired or undersized pump that was adequate for a tank heater can leave you with cold water off grid. A pump in the three to five gallon per minute class with an accumulator tank is the usual answer.
Does an electric RV tankless heater avoid the technician visit? No, it moves it. Electric and hybrid units draw serious amperage and the 120 volt wiring and breaker work belongs to a certified technician or licensed electrician instead of a gas fitter.
What about venting clearances? They are set by the manufacturer and by code, they vary by model, and they cover distances from windows, vents, doors, and the propane fill. Confirm the location with your technician before you cut anything.
The Bottom Line
Plan the job as two halves. Yours is the tape measure, the opening, the mount, the butyl tape and sealant, the water lines, and the 12 volt supply done to the manufacturer’s gauge and fuse rating. A certified RV technician handles the gas connection, the leak test, the first fire, and any 120 volt work, and booking them for an hour on a rig that is already mounted and plumbed keeps the cost sensible. Measure before you shop, respect the inlet and outlet markings, and fit a propane and carbon monoxide alarm with a valid date before the first fire.