Last updated: August 14, 2026
Most RV water pump repair jobs are not repairs at all. The single most common cause of a pump that will not run, will not build pressure, or will not shut off is something outside the pump itself: a blown fuse, a switch that was never on, a strainer packed with debris, a winterizing valve left in the wrong position, or air getting into the suction line through a fitting that has worked loose. Owners replace a lot of perfectly good pumps because those five things look identical to a dead pump from the sink.
So this guide runs in the order a technician would run it. Symptoms first, then the checks that cost nothing, then the three parts that genuinely do fail and can be replaced individually, and finally the honest question of when a new pump is the smarter purchase than a rebuild kit. Every step is 12 volt work, which is within reach of most owners with a screwdriver, a wrench, and a multimeter, and we flag the points where the job stops being yours.
This article contains affiliate links. If you buy through them, we may earn a commission at no extra cost to you. Learn more.
Quick Answer
How do you fix an RV water pump?
- Start free: fuse, switch, 12 volts at the pump terminals, water in the tank, valves set to tank rather than city or winterize, and a clean strainer screen.
- If power and water are both reaching it, the usual culprits are an air leak on the suction side, a failed check valve, or a worn pressure switch, and all three are replaceable parts.
- Replace rather than rebuild when the housing is cracked, the motor is seized or burnt, the pump has been run dry repeatedly, or it is simply old and noisy.
Symptoms, Causes, and Actions at a Glance
Find the behavior you are seeing in the left column. The middle column is what it usually means, and the right column is the first thing to do about it, in the order that solves it fastest.
| What the pump does | What it usually means | What to do first |
|---|---|---|
| Nothing at all, no sound | No power reaching the pump | Check the fuse, the pump switch, and the 12V supply at the pump terminals |
| Hums or clicks but does not move water | Motor has power but the pump is stalled, frozen, or airlocked | Confirm water in the tank, then check for a frozen or blocked line |
| Runs but nothing comes out | Lost prime, an air leak on the suction side, or a closed valve | Open a faucet, check tank level and valve positions, inspect suction fittings |
| Runs, then spits air and water | Air being drawn in before the pump, or a low tank | Tighten and inspect every fitting between tank and pump inlet |
| Cycles on and off with taps closed | A leak in the system, or a failing check valve letting pressure bleed back | Look for drips at fittings and the toilet, then test the check valve |
| Will not shut off at all | Pressure switch not reaching cutoff, or the system never builds pressure | Check for an open faucet or leak first, then the pressure switch |
| Weak flow at every faucet | Clogged strainer or filter, kinked line, or a tired pump | Clean the inlet strainer and check the water filter cartridge |
| Weak flow at one faucet only | An aerator or a fixture screen, not the pump | Unscrew and clean that aerator before touching anything else |
| Loud hammering and vibration | Rigid plumbing, hard mounting, or no accumulator | Add flexible hose at the ports, loosen the mounting, consider an accumulator |
| Leaks from the pump body | Failed seal, cracked housing, or freeze damage | Inspect for cracks; a cracked housing means replacement, not repair |
| Blows the fuse repeatedly | Seized motor or a short in the wiring | Stop resetting it and find the fault before it becomes a fire risk |
| Runs while on city water | Failed check valve letting city pressure back through the pump | Turn the pump off on city water, then replace the check valve |
If your symptom is one of the persistent ones, we cover it in depth separately: the pump runs but no water comes out, the pump keeps running, and the pump will not shut off.
Start With the Checks That Cost Nothing
Run these six in order before you open a parts catalog. On a typical service call, they resolve the complaint more often than any component replacement does, and they take about fifteen minutes with a flashlight.
- The fuse. RV water pumps are usually protected by a fuse in the 10 to 15 amp range in the 12 volt distribution panel, sometimes labeled simply water pump. Pull it and look at the element rather than trusting a glance through the plastic.
- The switch, and every switch. Many rigs have more than one: a panel switch inside, sometimes a second switch in a wet bay, and occasionally a pump controller with its own power button. All of them have to be on.
- Voltage at the pump itself. With the switch on and a faucet open, a multimeter across the pump’s own terminals should read close to battery voltage, roughly 12.6 volts at rest and higher while charging. A reading that is well below that points at wiring, a corroded ground, or a bad switch rather than at the pump.
- Water in the fresh tank. Tank monitors lie constantly. Confirm the level another way before you conclude anything, because a pump running dry sounds exactly like a pump that has failed.
- Valve positions. Fresh tank valve open, winterizing or bypass valve set to normal operation rather than to the antifreeze siphon, and the city water inlet not feeding the system while you test. A valve left over from winterizing is one of the most common no water calls of the spring.
- The inlet strainer. Almost every RV pump has a clear strainer at its inlet. Shut the pump off, close the tank valve, unscrew the strainer, and rinse the screen. Sediment, sanitizer flakes, and bits of tape collect there and starve the pump.
If the pump ran dry or the system was opened up, it may simply need priming again, which is its own short procedure covered in how to prime an RV water pump. For a step by step version of this whole sequence with the meter readings spelled out, see troubleshooting an RV water pump step by step.
🧽 The cheapest part that fixes weak flow
A clear inline strainer with a removable screen, mounted at the pump inlet so you can see debris before it becomes a symptom. If yours is cracked, cloudy, or missing entirely, this is the part to fit while you are already under there.

Air Leaks: The Fault Everyone Misdiagnoses
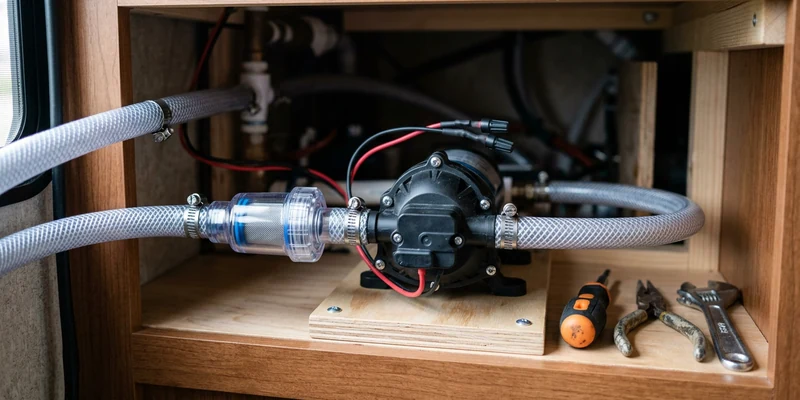
If the pump runs strongly but delivers a sputtering mix of air and water, or loses prime every time the rig sits, the problem is almost always on the suction side. Anywhere between the fresh tank and the pump inlet, a loose fitting, a hardened O ring, or a cracked barb can pull air without ever leaking a drop of water outward, because that section of line is under vacuum rather than pressure.
Work along that run with the pump off. Hand tighten every threaded connection, check that hose clamps are seated on the barb rather than past it, and look for chalky mineral trails that mark a slow weep. Swivel fittings on the pump inlet have a small O ring inside that flattens with age and is worth replacing on sight. Then run the pump with a faucet open for a minute so the line can purge; air that entered the system takes longer to clear than most people expect.
The Three Parts That Actually Fail
When power and water are both reaching the pump and the suction side is tight, the fault is inside the pump, and it is nearly always one of three components. All three are sold as service parts for the common Shurflo and Flojet models, which is what makes owner level repair realistic.
The check valve
The check valve stops water flowing backward through the pump. When it fails, pressure bleeds back into the tank and the pump wakes up every few minutes with the taps closed, or city water pushes backward through the pump and into the fresh tank while you are hooked up. It is a small, inexpensive part, usually at the pump outlet or built into the port fitting, and replacing it is a two wrench job. Full symptoms and the swap are in our guide to the RV water pump check valve.
🔁 For a pump that cycles with the taps closed
A replacement check valve or backflow preventer sized to your pump’s port thread, typically 1/2 inch NPT on common RV pumps. Match the direction arrow to the flow and use fresh thread sealant when you fit it.

The pressure switch
The pressure switch tells the motor when to stop. RV pumps commonly cut off somewhere in the 40 to 55 psi range, and as the switch ages, that cutoff drifts, sticks, or stops happening altogether. The symptoms are a pump that runs on after the taps are closed, or one that hunts on and off in short bursts. Many switches include a small adjustment screw, but adjusting a worn switch is a temporary measure at best, and the replacement part is inexpensive. Our guide on the RV water pump pressure switch covers adjusting versus replacing.
⚙️ For a pump that will not shut off
A replacement pressure switch, or the combined switch and diaphragm service kit for your pump model. The kit is the better value when the pump has some years on it, since the diaphragm is the other wear item and both come apart together.

The diaphragm and pump head
The diaphragm is the flexible membrane that does the actual pumping. It stiffens with age, tears if the pump is run dry, and splits if water is left in the pump over a hard freeze. A pump with a failed diaphragm runs at normal speed but produces weak, uneven pressure. This is the part most likely to justify a full replacement instead, because by the time a diaphragm goes, the valves and seals around it are the same age.
Noise, Pulsing, and Vibration
A loud pump is not necessarily a failing pump. RV pumps are positive displacement units, so they deliver water in pulses, and everything they are bolted to amplifies that. Three fixes address nearly all of it, in increasing order of effort.
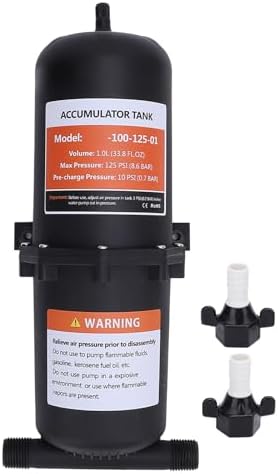
First, decouple the pump from the structure: mount it on its rubber feet without crushing them, and never bolt it tightly to a thin plywood panel, which acts as a soundboard. Second, replace the rigid plumbing at the inlet and outlet with short flexible hoses, which stops vibration traveling into the pipe runs and the walls. Third, fit an accumulator tank, a small pressurized vessel that smooths the pulses and reduces how often the pump cycles for small draws like rinsing a cup.
🔇 For a pump you can hear from the bedroom
A silencing kit with short flexible hoses for the inlet and outlet ports, which is the single most effective noise fix for a pump that is otherwise healthy. Match the thread size to your pump’s ports before ordering.

💧 For pulsing pressure and constant cycling
An accumulator tank plumbed on the outlet side, which stores a small volume of pressurized water so the pump does not restart for every brief draw. It also evens out the pressure at the faucet, which is the difference most owners notice first.
If noise is the main reason you are here rather than a fault, compare the models built specifically for it in our roundup of the quietest RV water pumps.
When Replacing Beats Repairing
Rebuild kits are genuinely worthwhile in some situations and false economy in others. The honest dividing line is condition and age, not the price of the kit, and it comes down to five signals.
| Situation | Repair or replace | Why |
|---|---|---|
| Check valve or pressure switch failed, pump otherwise strong | Repair | These are designed as service parts and swap out in under an hour |
| Torn diaphragm on an older pump | Usually replace | The valves, seals, and switch are all the same age as the diaphragm |
| Cracked housing or split port | Replace | Housings are not repairable, and sealant on a crack fails under pressure |
| Motor seized, or fuse blows immediately | Replace | A seized motor draws heavily and can damage wiring before it stops |
| Freeze damage after a missed winterization | Replace | Ice usually damages several internal parts at once, not just the one you can see |
| Pump is old, loud, and low on flow | Replace | Newer pumps run quieter and deliver more consistent pressure for modest money |
There is also a straightforward upgrade argument. Many older rigs left the factory with a basic pump in the 3 gallon per minute class, and current replacements in the 3 to 5.5 gallon per minute range with variable speed control run quieter and hold steadier pressure with two fixtures open. Swapping like for like is a bolt in job in most rigs: two hose connections, two wires, and four screws.
🚿 When the pump itself is done
A 12V RV water pump rated somewhere around 3 to 5.5 gallons per minute with a built in pressure switch and standard 1/2 inch NPT ports. Match the flow rating to your fixture count rather than buying the biggest available, and check the port spacing against your existing mount before ordering. Our full comparison of the best RV water pumps covers the sizing.

Doing the Swap Yourself
A pump replacement is one of the friendlier RV jobs, and the sequence rarely varies. Turn the pump switch off and disconnect the negative battery cable or pull the pump fuse. Open a faucet to release pressure, then place a towel under the pump because the lines will hold water. Note which wire goes to which terminal before you disconnect anything, since polarity matters and the colors are not always what you expect.
Unscrew the inlet and outlet fittings, unbolt the mount, and fit the new pump on its rubber feet without over tightening the screws. Use fresh thread sealant tape on threaded ports, connect the wiring, restore power, and then run the system with a faucet open until the flow is steady and free of air. Check every joint for weeping under pressure before you close the compartment, and check again the next morning, since slow leaks announce themselves overnight.
Where This Stops Being a DIY Job
The 12 volt side of a water pump is owner territory. These situations are not, and recognizing them early is what keeps a small repair from becoming a large one.
- Anything on the 120 volt side. If your rig has a residential style pump or a system tied into shore power wiring, that work belongs to a certified RV technician or licensed electrician, not to a driveway repair.
- Water where it should not be. Soft spots in the floor, stained ceilings, swollen paneling, or a musty smell mean water has been in the structure. Find the source, then have the damage assessed properly, because subfloor rot is a repair with a deadline.
- Leaks you cannot see. A pump that cycles with every faucet closed and no visible drip means water is going somewhere inside a wall or under the floor. That is a diagnosis job with proper tools.
- Repeated fuse failures. A circuit that blows fuses is telling you about a short or a seized motor. Replacing the fuse with a larger one is how wiring harnesses catch fire.
- Anything involving the water heater’s gas side. Water heater plumbing overlaps with propane components, and burner, gas valve, and regulator work belongs to a certified RV technician without exception.
Keeping It From Happening Again
Water pumps fail for boring reasons, and the same four habits prevent most of them. Rinse the inlet strainer a few times a season, since a starved pump works harder and wears faster. Never run the pump dry, including the moment after you drain the tank, because dry running is what tears diaphragms. Winterize properly every fall, since freeze damage is the leading killer of RV pumps and it is entirely preventable.
And protect the whole system from campground pressure. A regulator at the city water inlet keeps supply pressure in the range RV plumbing is built for, which is generally well under what some pedestals deliver, and that protects fittings and the pump’s check valve alike. Our guides on RV water pump maintenance and how much water pressure is too much cover both routines, and winterizing without a blowout kit handles the fall job.
Water quality matters too, less for the pump than for everything downstream. A filter keeps sediment out of the strainer and the valve seats, and it is the reason some pumps last twice as long as others in the same rig. See our comparison of inline RV water filters, and sanitize the fresh tank on a schedule using this walkthrough.
Common Mistakes to Avoid
- Replacing the pump first. Fuse, switch, valve position, and strainer account for a large share of no water complaints, and all four are free to check.
- Chasing a leak on the pressure side when the fault is on the suction side. Air leaks before the pump never drip. They just ruin the prime.
- Adjusting the pressure switch instead of replacing it. The screw buys you a few weeks on a worn switch and hides the real problem.
- Bolting the pump down hard to stop vibration. Rigid mounting transmits noise into the structure. The rubber feet are there for a reason.
- Running the pump dry to empty the lines. That is how diaphragms tear. Drain from the low point valves instead.
- Skipping the pressure regulator. Campground pressure varies enormously and RV plumbing does not forgive the high end of it.
Where to Go From Here
If you have a specific symptom rather than a general fault, go straight to it: common RV water pump issues and what they mean is the symptom dictionary, and the step by step troubleshooting sequence is the version to follow with a meter in hand.
If you have already decided the pump is finished, our roundup of the best RV water pumps covers flow ratings, noise, and fitment, and the quietest models get their own comparison for anyone who camps with light sleepers.
Frequently Asked Questions
Why does my RV water pump run but no water comes out? It has lost its prime, is pulling air through a fitting on the suction side, or a valve is closed. Confirm tank level and valve positions, then check every connection between tank and pump inlet.
Can I repair an RV water pump instead of replacing it? Often yes. Check valves, pressure switches, strainers, and diaphragm kits are all sold as service parts for common models. Replace instead when the housing is cracked, the motor is seized, or the pump suffered freeze damage.
How long does an RV water pump last? Owners commonly report several years of regular use, with the biggest variables being freeze protection, water quality, and whether the pump has ever been run dry.
Why does my pump cycle on and off when nothing is running? Either the system is losing pressure through a leak or a failing check valve is letting water bleed back. Look for drips first, including at the toilet valve, then test the check valve.
What pressure should an RV water pump run at? Most RV pumps cut off somewhere in the 40 to 55 psi range. On city water, a regulator at the inlet keeps campground supply within the range the plumbing is built for.
Is a noisy water pump a sign of failure? Not by itself. Positive displacement pumps pulse, and rigid plumbing or hard mounting amplifies it. Flexible hoses, soft mounting, and an accumulator tank fix most noise complaints on a healthy pump.
The Bottom Line
Work from free to expensive: fuse, switch, voltage at the pump, tank level, valve positions, and strainer, then the suction side fittings that let air in. Only after that do the three real failure parts come into play, and a check valve or pressure switch is an hour of work. Replace the whole pump when the housing is cracked, the motor is seized, the diaphragm has torn on an older unit, or a freeze got to it, and call a certified technician the moment you find water inside the structure.