Last updated: August 14, 2026
The pump is buzzing away under the dinette, the faucet is wide open, and nothing arrives. When an RV water pump runs but no water comes out, the fault is almost always on the suction side, between the fresh tank and the pump inlet, not in the pump motor you can hear working. Water is not reaching the pump, so there is nothing for it to push.
That narrows the search enormously. This guide follows the water in the order it travels, tank, valves, inlet line, strainer, pump, then the lines to the tap, and stops at each point where the flow could be interrupted. Almost every fix in the first half costs nothing. Keep the pump switched off between checks, since a pump running dry wears out its diaphragm fast.
This article contains affiliate links. If you buy through them, we may earn a commission at no extra cost to you. Learn more.
Quick Answer
Why does an RV water pump run but produce no water?
- Water is not reaching the pump. The usual suspects are an empty tank, a closed tank valve, a winterizing bypass left in the wrong position, or a lost prime.
- Next in line: a clogged inlet strainer, a collapsed or kinked suction hose, an air leak at an inlet fitting, or a frozen line in cold weather.
- Only after all of that does a dead diaphragm or a seized pump become the likely answer.
Follow the Water: Symptoms and Causes in Order
Work this table from top to bottom. It is arranged in the order the water travels, so the first row you cannot confirm is where your problem lives.
| Where you are looking | What goes wrong there | What to do |
|---|---|---|
| Fresh water tank | Tank is empty even though the monitor says otherwise | Add water and try again before anything else |
| Tank outlet valve | Valve closed or partly closed after service or storage | Open it fully, follow the line to confirm |
| Winterizing and bypass valves | Siphon valve or water heater bypass in the wrong position | Return every valve to normal service position |
| Suction hose | Kinked, collapsed, cracked, or drawing air at a fitting | Straighten, tighten by hand, replace hardened hose |
| Inlet strainer | Clogged with tank debris, or a dry O ring letting air in | Remove, rinse, reseat with a good seal |
| Pump prime | Pump lost its prime and is churning air | Follow the priming procedure, do not let it run dry |
| Pump itself | Worn diaphragm, cracked head, seized motor | Replace the pump once the inlet side checks out |
| Downstream lines and taps | Frozen line, blocked aerator, closed fixture valve | Warm the coach, clean aerators, open fixture stops |
Start With Water, Valves, and Air
The three checks that solve most cases are free and take a few minutes. Do them in this order, and open a faucet each time so the system can bleed air while you test.
- Prove there is water in the tank. RV tank monitors corrode and lie. Add a measurable amount of fresh water and listen for the pump note to change, which is a better indicator than any panel light.
- Open every valve between tank and pump. Tank outlet, any inline shutoff, and the fill or drain valves. Trace the line by hand from the tank to the pump inlet rather than trusting labels.
- Reset the winterizing setup. If the antifreeze siphon hose is still in place, the pump may be drawing on an empty jug instead of the tank. Put the siphon valve back to tank position and the water heater bypass back to normal service.
- Open the highest faucet and let air out. Hot side and cold side both. Air trapped high in the system blocks flow and makes the pump sound like it is working hard for nothing.
- Check the fuse and battery. A pump that spins slowly on a weak battery may not self prime. A resting 12 volt battery usually reads around 12.6 to 12.8 volts, and self priming gets unreliable as it sags.
If the pump sounds like it is running faster and lighter than normal, it is moving air, not water. That is a prime problem, and the step by step method is in our guide to priming an RV water pump.
The Inlet Strainer and the Suction Line
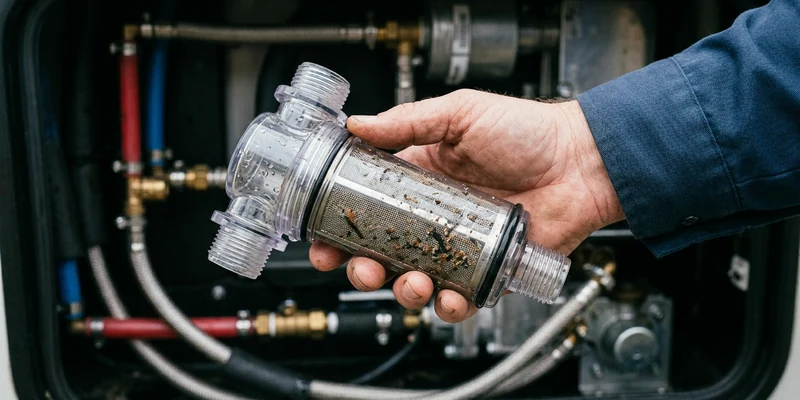
Once the tank and valves check out, the inlet side of the pump is where the trail almost always ends. The strainer traps debris that would otherwise reach the diaphragm chambers, and it clogs quietly over a season or two of tank sediment.
Clean the strainer properly
Switch the pump off, place a small pan underneath, unscrew the strainer bowl, and rinse the mesh until it is clear. Inspect the O ring while it is out, because a flattened or dried seal draws air on every stroke and produces exactly the symptom you are chasing. Reseat by hand and only snug it, since plastic strainer bowls crack when they are cranked down with a wrench.
Test the hose for air
Hardened, cracked, or repeatedly reused hose is a common air path, and so is a barb fitting that was never fully seated. Owners often find the leak by wetting each inlet joint and watching for the pump note to steady briefly as the water seals the gap. A clear inline strainer makes this far easier, because you can see whether the pump is pulling water or foam.

If the coach has been below freezing, treat a solid blockage as ice until proven otherwise. Do not force pressure into a frozen line, warm the space and let it thaw, then check for splits before running the pump again. Preventing that in the first place is covered in our guide to keeping RV pipes from freezing.
When the Pump Is Actually Dead
A pump can hum, vibrate, and still move nothing. The two usual causes are a worn diaphragm that no longer creates suction and a check valve inside the head that is stuck open, letting water shuttle back and forth instead of forward.
You can separate the two with a simple test. Disconnect the inlet line and put the pump inlet in a bucket of clean water at the same height as the pump. If it will not draw from a bucket sitting right next to it with a clean strainer, the pump has lost its ability to prime and no amount of plumbing work will fix that. If it draws happily from the bucket, the problem is back in the tank line. When the internal one way valve is the suspect, our guide to the RV water pump check valve covers testing and replacement.
Replacement is the usual outcome for a pump that will not draw. Most RV pumps are 12 volt, self priming, and rated somewhere around 3 to 5.5 gallons per minute, with 1/2 inch ports. Match flow and port size to what came out so the fittings and the plumbing behave the same, and see our roundup of the best RV water pumps for the tradeoff between flow, noise, and current draw.

Where the DIY Line Sits
Cleaning a strainer, opening valves, priming, and swapping a 12 volt pump are all owner level jobs with the fuse pulled or the negative battery lead disconnected. Hand it to a certified RV technician when the blockage is inside a wall or the underbelly, when a frozen line has split somewhere you cannot see, or when the pump circuit traces back into 120 volt wiring at the converter or breaker panel. Also leave the propane side of the water heater alone entirely, including the burner and gas fittings, no matter what the plumbing seems to be doing.
Common Mistakes to Avoid
- Letting it run dry while you think. Minutes of dry running can cost a diaphragm. Switch the pump off between checks.
- Believing the tank monitor. Add real water before you conclude the tank is not empty.
- Overtightening the strainer bowl. Hand snug is correct, a wrench cracks the plastic and creates a new air leak.
- Skipping the winterizing valves. If this started after storage, one valve is almost certainly still in antifreeze position.
- Forcing a frozen line. Pressure against ice splits fittings. Thaw first, then inspect.
Frequently Asked Questions
Why does my pump run but only sputter water? Sputtering means air mixed with water, so the pump is drawing air at a fitting, a strainer O ring, or a low tank pickup. Fix the air leak and the sputtering goes with it.
How long can an RV water pump run dry? Not long. Owners commonly report diaphragm and seal damage after just a few minutes, so switch it off as soon as you know no water is coming.
Does the pump work if I am on city water? No, and it does not need to. City water pressure bypasses the pump, so having water on the hose but not on the pump narrows the fault to the pump and the tank line.
Can a clogged water filter stop the flow? A neglected inline filter can restrict flow badly. Replace it on schedule and check it early when flow drops across every fixture at once.
Do I need to prime a self priming pump? They usually prime themselves, but after winterizing, a tank runout, or a pump swap they often need help. The priming procedure takes a few minutes.
The Bottom Line
A pump that runs without delivering is starved, not broken, until you prove otherwise. Follow the water in order: real water in the tank, every valve open, winterizing setup reset, strainer clean with a good O ring, suction hose sound and air free. If the pump will not draw from a bucket sitting right beside it, that is the moment to replace it, and not before.