Last updated: August 14, 2026
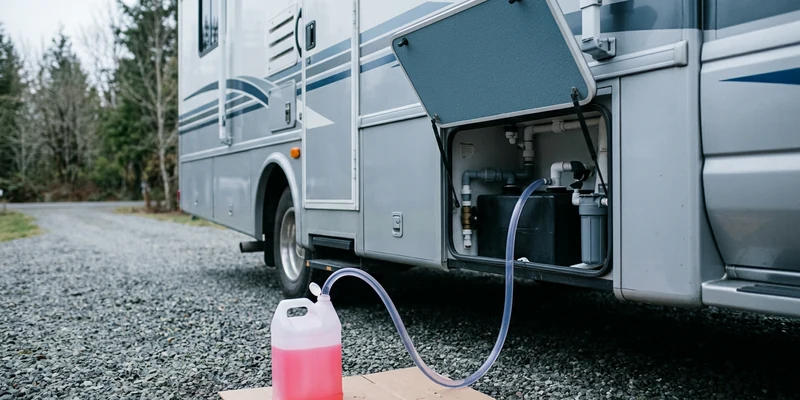
You do not need an air compressor to put a rig away for the winter. The antifreeze method is the standard alternative, and the piece of hardware that makes it work is an RV water pump winterizing kit, a short siphon hose and a diverter valve that lets the pump draw from a jug instead of from the fresh tank. Many rigs already have one fitted at the pump and the owner has simply never noticed the extra hose and the little lever.
Done properly, the antifreeze route protects the pump, the lines, the fixtures, and the traps, and it is arguably more forgiving than a blowout because it does not rely on getting every last drop out of a low spot you cannot see. This guide covers the full sequence, the part everyone forgets, and the honest boundary where a job in your driveway turns into a job for a certified technician.
This article contains affiliate links. If you buy through them, we may earn a commission at no extra cost to you. Learn more.
Quick Answer
How do you winterize an RV water pump without a blowout kit?
- Drain everything first: fresh tank, both low point drains, and the water heater once it is cool and depressurized. Then bypass the water heater so it does not swallow gallons of antifreeze.
- Use the pump’s own winterizing kit, a siphon hose into a jug of non toxic RV antifreeze, and run the pump until pink fluid appears at every fixture, hot and cold.
- Finish with the outside shower, the toilet, and a cup of antifreeze down each drain for the traps, then switch the pump off and leave the system unpressurized.
The Whole Job in Order
Work down this table in sequence. Each step depends on the one above it, and the two most commonly skipped rows are the heater bypass and the traps.
| Step | What you do | Why it matters |
|---|---|---|
| 1. Drain the fresh tank | Open the tank drain and let it empty completely | Antifreeze cannot protect a tank that is half full of water |
| 2. Drain the water heater | Only when cool and unpressurized, with the pressure relief lever opened | A hot pressurized tank is the one genuinely dangerous part of this job |
| 3. Open the low points | Both hot and cold low point drains, plus every faucet | Gravity does the bulk of the work for free |
| 4. Bypass the heater | Set the bypass valves behind the heater | Otherwise you fill six or ten gallons of tank with antifreeze |
| 5. Remove the filters | Take out any inline or under sink cartridge | Carbon media absorbs antifreeze and hands the taste back in spring |
| 6. Connect the kit | Siphon hose into the jug, diverter valve turned to winterize | This is what lets the pump draw from a jug instead of the tank |
| 7. Pump it through | Run each fixture, cold then hot, until the flow turns pink | Pink at the faucet is the only proof that line is protected |
| 8. Do the extras | Outside shower, toilet, ice maker line, washer if fitted | These are the lines people find split in spring |
| 9. Fill the traps | A cup or so of antifreeze down each sink, shower, and toilet | P traps hold water that gravity will not remove |
| 10. Shut it down | Pump off, valve back to normal, system left unpressurized | A pump left switched on can cycle against a closed system |
If your rig is staying in use through the cold rather than going into storage, this is the wrong procedure entirely and you want how to keep RV pipes from freezing instead.
What the Winterizing Kit Actually Is
The kit is deliberately simple: a length of clear hose with a filter screen on the end, a swivel fitting that threads into the pump inlet, and in most versions a three way valve that switches the pump’s suction between the fresh tank and that hose. Turn the valve, drop the hose in a jug, and the pump becomes an antifreeze transfer pump.
Check before you buy anything. A great many rigs left the factory with this fitted, and the giveaway is a short second hose near the pump with a screw cap or a spare inlet port with a small lever. If yours has one, your entire hardware requirement for this job is a few jugs of antifreeze and a screwdriver.
🔧 If your rig does not already have one
A water pump converter kit, meaning the siphon hose plus the diverter valve, matched to your pump’s port thread. Most common RV pumps use half inch NPT ports, so check yours before ordering, and pick a version with a strainer on the pickup end so debris from the jug never reaches the pump. Fitting it is two wrenches and fresh thread sealant.

Doing It Step by Step
Set aside a couple of hours and do it on a day when the temperature is still above freezing, since fighting a partly frozen system is how people crack fittings while trying to protect them.
- Drain the fresh tank and the low points. Open the tank drain, both low point drains, and every faucet including the outside shower, and let gravity empty as much as it will. Leave them open while you do the next step.
- Deal with the water heater properly. Switch it off and let it cool completely. Relieve the pressure by opening a hot faucet and lifting the pressure relief lever, then remove the drain plug or anode rod and let it empty. Never pull a plug on a heater that is hot or still under pressure.
- Set the bypass. Behind the heater there are usually two or three valves. Set them so water is routed past the heater rather than through it. If your rig has no bypass, fitting one is a worthwhile afternoon and it pays for itself in antifreeze the first season.
- Take the filters out. Any inline hose filter, any under sink cartridge, and the pump inlet strainer screen if it is easy to reach. Rinse the strainer while it is out.
- Connect the kit. Screw the siphon hose into the pump inlet or open the diverter valve, and put the pickup end into a jug of non toxic RV antifreeze. Keep a second jug open and ready, because running the pump dry mid job is exactly what you are trying to avoid.
- Pump it through, one fixture at a time. Switch the pump on and open the cold side of the fixture nearest the pump until the flow runs pink, then close it and do the hot side. Work outward fixture by fixture: kitchen, bathroom sink, shower, toilet, outside shower. Closing each one as it turns pink keeps pressure up for the next.
- Do not forget the extras. An ice maker line, a washer, a dishwasher, or a second bathroom all need the same treatment. These are the lines that split over winter because nobody remembered they existed.
- Fill the traps. Pour a cup or so of antifreeze into every sink and shower drain and into the toilet bowl, and flush a little into the black tank. Gravity does not empty a P trap.
- Shut down and label it. Pump off, diverter valve back to the tank position or the siphon hose capped, low point drains closed or left open according to preference, and a note on the fresh water fill so nobody fills the tank in February. Leave the system unpressurized.
🧴 The only antifreeze that belongs in this system
Non toxic RV and marine antifreeze, the pink propylene glycol type sold specifically for potable water systems. Automotive antifreeze is a completely different chemical, it is poisonous, and it must never go anywhere near a drinking water system. Buy more jugs than you think you need, since a rig with two bathrooms and a washer goes through the pile quickly.

The Water Heater Is the Step That Bites
More winterizing failures trace back to the water heater than to anything else, in both directions. Skip the bypass and you pump gallons of antifreeze into a tank that did not need it, then spend a long spring morning rinsing it out. Skip the drain and you leave several gallons of water sitting in a metal tank in an exterior compartment through every freeze of the season.
Take the time to find your bypass valves and understand which position is which before you start pumping. On most rigs there are three valves and only one combination is correct, and a photograph of the correct positions taped inside the compartment door is one of those small habits that saves a lot of second guessing.
Where the heater stops being yours
Draining the water side of a cool, unpressurized heater is normal owner work. The burner, the gas valve, the regulator, and any gas line adjustment are not, and they belong to a certified RV technician without exception. If the heater is misbehaving as well as needing draining, deal with the storage first and the fault separately.
🔀 If your rig has no bypass at all
A water heater bypass kit with the valves and fittings to route around the tank. On older rigs without one, this is the single upgrade that makes every future winterizing quicker and cuts the antifreeze you use dramatically. Check the port sizes on your heater before ordering, and fit it while the system is drained anyway.

Where This Stops Being a DIY Job
The antifreeze route is owner territory almost end to end. These are the exceptions, and the first one is genuinely a safety matter rather than a matter of skill.
- A hot or pressurized water heater. Never remove a drain plug or anode rod from a heater that has not cooled and been depressurized. Switch it off, give it hours rather than minutes, open a hot tap, and lift the relief lever before anything comes out.
- Anything on the propane side. Gas lines, regulators, the heater’s gas valve, and burner adjustment are for a certified RV technician. If you smell gas at any point, shut the propane off at the tank, leave the rig, and call a professional rather than investigating.
- 120 volt components. Residential style pumps, tank heaters wired into shore power, and anything at the breaker panel are not driveway work.
- A pump that will not draw antifreeze. If the pump runs but will not pull from the jug, stop and diagnose rather than letting it run dry, since dry running is what tears diaphragms. Our water pump repair guide covers the usual causes, which are almost always an air leak or a valve in the wrong position.
Common Mistakes to Avoid
- Forgetting the heater bypass. It is the difference between three jugs of antifreeze and eight, and a much longer rinse in spring.
- Leaving a filter cartridge in. Carbon absorbs antifreeze and hands the taste back for weeks after you de winterize.
- Skipping the outside shower. It is the most commonly forgotten fixture and it sits in an unheated bay.
- Ignoring the P traps. Gravity does not empty them, and a cracked trap under a sink is a genuinely irritating repair.
- Running the pump dry between jugs. Keep the next jug open and ready. Dry running is what damages diaphragms.
- Using automotive antifreeze. It is a different chemical entirely, it is poisonous, and it has no place in a potable system.
Where to Go From Here
In spring, the reverse of this job is short: drain the antifreeze, flush the system, then sanitize the fresh tank before you drink anything out of it. How to sanitize an RV fresh water tank is the procedure, and it is the natural companion to this one.
If the pump gave you trouble during the process, deal with it now rather than in the spring rush. RV water pump repair covers the three parts that actually fail, water pump maintenance covers the habits that prevent most of it, and if the pump is simply finished, our comparison of the best RV water pumps covers flow ratings and fitment. Batteries need their own attention over the same period, which is covered in keeping RV batteries charged in winter storage.
Frequently Asked Questions
Can you winterize an RV without an air compressor? Yes, and the antifreeze method is the standard way to do it. A pump winterizing kit lets the onboard pump draw from a jug and push antifreeze through every line and fixture.
How much RV antifreeze do I need? It depends on the rig, and the biggest variable is whether the water heater is bypassed. Owners with a bypass fitted typically use a few jugs, while a rig without one can take several times that.
Do I need to drain the fresh tank first? Yes. Antifreeze mixed into a partly full tank is diluted antifreeze, which is exactly what you do not want protecting your plumbing.
Should I put antifreeze in the fresh water tank? Most owners do not. Drain it instead, since filling a large tank with antifreeze is expensive, wasteful, and takes a long rinse to undo in spring.
Can I use automotive antifreeze? No, never. Use only non toxic RV and marine antifreeze made for potable water systems. Automotive coolant is poisonous and has no place in a drinking water system.
Do I still need to winterize if the rig is in a heated storage building? If the building genuinely stays above freezing and does so reliably, many owners skip it. If it is unheated, unmonitored, or you are unsure, winterize.
The Bottom Line
Drain the fresh tank, the low points, and the cooled water heater, then bypass the heater and use the pump’s own winterizing kit to draw non toxic RV antifreeze through every fixture until each one runs pink. Finish with the outside shower, the toilet, and a cup down every drain for the traps, then shut the pump off and leave the system unpressurized. Never open a hot or pressurized water heater, never use automotive antifreeze, and leave anything on the propane or 120 volt side to a certified technician.