Last updated: August 14, 2026
Most people learn how to use RV leveling blocks the hard way, by stacking a pile in front of a tire, driving up, and discovering the camper is now level in one direction and worse in the other. The order is what makes it easy: side to side first with blocks under the tires, then front to back with the tongue jack or the landing gear, and only then chocks, stabilizers, and slide-outs.
Getting it right is not just about a door that stays where you put it. An absorption refrigerator needs a reasonably level cabinet to circulate its coolant, slide-out mechanisms bind when the coach is twisted, and shower water pools in the wrong corner when the rig sits low at the back. This guide covers the sequence, how many blocks to use, the mistakes that crack them, and the line between leveling and lifting, which is the part that actually gets people hurt.
This article contains affiliate links. If you buy through them, we may earn a commission at no extra cost to you. Learn more.
Quick Answer
How do you use RV leveling blocks correctly?
- Check which side is low, build a ramp of blocks in front of the tires on that side, drive up slowly, then recheck and adjust.
- Level side to side with blocks under the tires first, then front to back with the tongue jack or landing gear, then chock the wheels.
- Support every tire on a tandem axle, keep the stack within the manufacturer specification for height and weight, and never use leveling blocks to hold an RV up while you work underneath it.
The Leveling Sequence, Step by Step
Do these in order. Skipping ahead to chocks or stabilizers is the reason a lot of people end up leveling twice.
- Pick your spot and look at the ground. Before the tires stop, scan for the flattest patch, and note which way the site slopes. Soft ground, gravel, and asphalt in summer heat all change how blocks behave, so the site matters as much as the technique.
- Check level while still hitched. Put a bubble level or a phone on a flat interior surface, the kitchen counter or the refrigerator shelf, and note which side is low and by how much. Many owners stick small bubble levels to the trailer frame, one for each axis, so this becomes a glance instead of a trip inside.
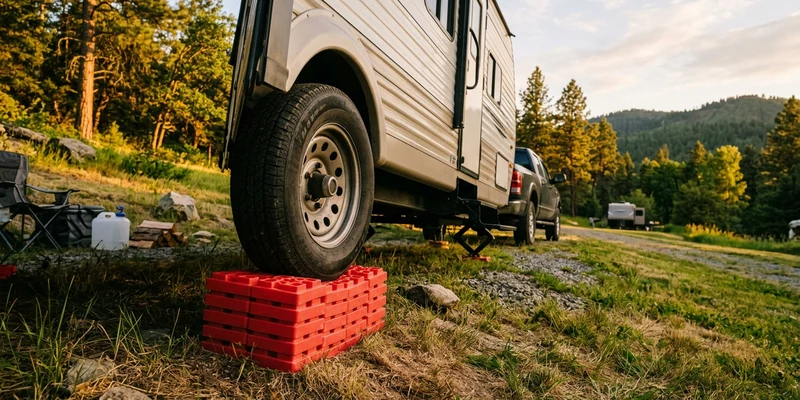
- Build the ramp on the low side. Stack blocks into a staircase in front of the low side tires, with the tallest step where the tire will sit. Interlocking blocks are designed to be built this way, and the stepped shape is what lets the tire climb instead of shoving the stack forward.
- Drive up slowly and stop on the flat. Idle speed, one smooth motion, and a spotter if you have one. The tire has to end up centered on the top block, not perched on the edge. A tire that overhangs the block loads it in the one direction it was not designed for.
- Recheck and adjust. Look at the level again. Adding or removing one block is normal, and it is faster than guessing right the first time. Each interlocking block usually adds roughly an inch of lift, so plan in those increments and confirm against the maker’s specification.
- Chock the wheels. Once side to side is right, chock front and back before anything else. On a stack, chocks go against the tire on the block, and wedge style chocks that fit between tandem tires are a useful addition rather than a replacement.
- Level front to back. Use the tongue jack on a travel trailer or the landing gear on a fifth wheel, with a block or jack pad underneath to spread the load on soft ground. Then unhitch if you are staying.
- Lower the stabilizers, then extend the slides. Stabilizer jacks steady the coach, they do not lift it. Extend slide-outs after the rig is level and settled, because running a slide on a twisted frame is one of the causes behind sticking and jerking, covered in our guide to RV slide-out problems.
How Many Blocks Do You Actually Need?
Fewer than most people stack. The goal is level enough for the appliances and the door, not laboratory flat, and every extra block raises the tire further from a stable base.
Work in single block increments and recheck between each one. If you find yourself building past the height the manufacturer allows, and four blocks is a common published limit for interlocking sets, the answer is a different parking spot rather than a taller tower. Owners who ignore that limit are the ones who describe stacks kicking out sideways when the tire climbs.
Reading the level that matters
Side to side is the axis that decides how the rig feels and how well an absorption refrigerator cools. Front to back matters for drains, for the shower, and for how the door swings. If you have an older absorption fridge and it is struggling, sitting off level for long periods is one of the classic contributing factors, which is why our diagnosis in RV refrigerator not cooling starts by asking how the rig was parked.
Block Styles and Where Each One Fits
Three formats cover almost every site. They are not interchangeable, and most owners eventually carry two of them.
| Style | How it works | Where it shines |
|---|---|---|
| Interlocking stackable blocks | Lego style pads you build into a staircase | Precise, repeatable lift; also usable under jacks and stabilizers |
| Curved ramp levelers | One piece ramp you drive onto, locked by a chock | Fast solo setup, no stacking, good on hard flat surfaces |
| Solid pads and jack blocks | Flat plates that spread load | Under tongue jacks, landing gear, and stabilizers on soft ground |
| Lumber offcuts | Whatever is in the garage | Cheap, but splits, absorbs water, and has no published rating |
Weight rating is the specification that decides whether a block is right for your rig, and it is published per block, not per set. A heavy fifth wheel puts far more on each tire than a small single axle trailer, so heavier coaches should be shopping in the heavy duty leveling block category rather than the general one.
What to Carry in the Storage Bay
How we chose: we looked at widely available leveling gear from established RV brands, weighted toward published weight ratings, stacking behavior, and how well each format packs away. Our assessment rests on manufacturer information and recurring owner feedback rather than any hands on trial of our own.
🧱 Best Overall
A set of interlocking stackable blocks is the default for a reason: it adjusts in small increments, works under tires and under jacks, and packs flat. Ten blocks is the common set size and enough for most single or tandem axle trailers. Check the per block weight rating against your axle loads, and see our comparison of stackable RV leveling blocks for the differences between sets.

⏱️ Best for Fast Solo Setup
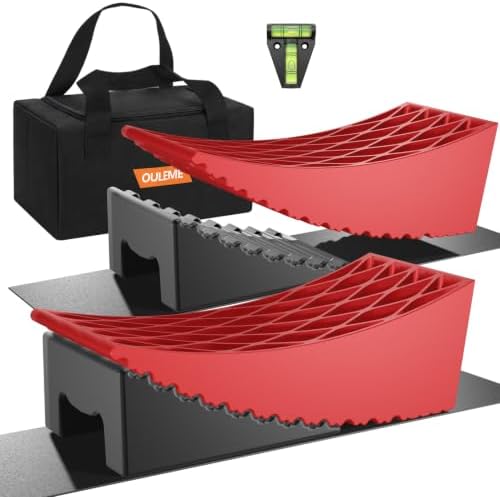
A curved ramp leveler removes the stacking step entirely: drop it in front of the tire, drive up until level, drop in the matching chock. Owners who set up alone in the dark tend to end up with one of these, and it pairs well with a small block set for the awkward sites. Best on firm, level surfaces, since the ramp needs a solid base under its whole length.
🛑 The Part People Forget
Chocks are not optional once a tire is on a stack. A pair of solid wheel chocks front and back is the baseline, and on tandem axles a wedge that spreads between the two tires adds useful stability. Buy chocks rated for your rig rather than the small plastic ones that came with a starter kit, and place them before you unhitch.

Where Leveling Stops and Lifting Begins
This is the safety line on this job, and it is a hard one. Leveling blocks and stabilizer jacks hold a rig steady. They do not hold it up, and neither is rated to keep a coach off the ground while a person is underneath it.
If you need to work under the RV, the coach goes on properly rated jack stands on firm ground, with the wheels chocked, and the weight never rests on plastic blocks or scissor stabilizers. Hydraulic and electric auto-leveling systems are their own category: a system that will not retract, leaks fluid, or drops on one corner is a job for a certified RV technician, not a driveway diagnosis, because a leg that releases under load is a serious injury. Same answer for a bent axle, a cracked frame member, or a trailer that will not sit level no matter what you put under it. Those are structural symptoms and they belong in a shop.
Common Mistakes to Avoid
- Leaving a tire hanging. On a tandem axle, both tires on the raised side need support. One tire carrying the load of two is how sidewalls and bearings get overloaded.
- Stacking past the published limit. Taller towers wobble and kick out. If the site needs more than the maker allows, move the rig.
- Parking with the tire on the edge. The block is designed for load in the middle of the pad. An overhanging tire cracks corners, especially in the cold.
- Chocking last. Chocks go in as soon as side to side leveling is done and before unhitching, not after the awning is out.
- Using stabilizers to lift. Scissor jacks cranked hard enough to raise a corner twist the frame and stress the slide-out mechanism.
- Skipping pads on soft ground. A tongue jack foot sinks into wet grass overnight, and the rig you leveled at dinner is off level by morning.
Where to Go From Here
Leveling is one of three arrival habits worth making automatic, alongside chocking and checking that the slides have clearance before they run. If you are still choosing a block set, our Camco leveling blocks review covers the set most owners meet first, and the stackable block roundup compares it against the alternatives. And if your interest in getting level started with a fridge that will not cool, work the system rather than the blocks, starting with an RV refrigerator that is not cooling.
Frequently Asked Questions
How level does an RV need to be? Level enough that the door and drains behave and an absorption refrigerator can circulate properly. Refrigerator makers publish their own tolerance, so check your manual rather than guessing, and treat side to side as the axis that matters most.
Can I stack leveling blocks as high as I want? No. Interlocking sets publish a maximum stack height, commonly around four blocks, and going past it makes the stack unstable. If the site needs more lift, find a flatter spot.
Do I put blocks under both tires of a tandem axle? Yes. Both tires on the raised side need to be supported, either with one long ramp or with two stacks. Leaving one tire in the air overloads the other.
Should I level before or after unhitching? Side to side first, while still hitched, since the tow vehicle helps you drive onto the blocks. Then chock, then use the tongue jack for front to back, then unhitch.
Can leveling blocks go under stabilizer jacks? Yes, and that is one of their better uses. A block or solid pad under the jack foot spreads the load on gravel or grass and keeps the foot out of the mud.
Is it safe to crawl under an RV on leveling blocks? No. Blocks and stabilizer jacks are not lifting devices. Use properly rated jack stands on firm ground, or have the work done at a shop.
The Bottom Line
Level side to side with blocks under the tires, chock, then level front to back with the jack, then stabilize and run the slides. Support both tires on a tandem axle, keep stacks within the published height and weight limits, and stop adding blocks when level is close enough for the fridge and the door. Blocks and stabilizers steady a rig, they never hold it up, so anything that puts you under the coach means jack stands or a technician.