Last updated: August 14, 2026
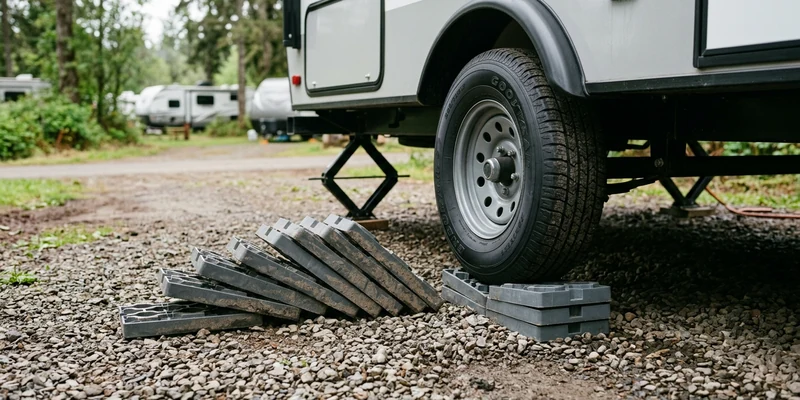
Stackable RV leveling blocks look like the least interesting purchase in the storage bay, right up until a set cracks under a tire on a cold morning in a gravel site. They are structural plastic carrying a corner of your rig, and the differences between sets are real: per block weight rating, how positively the pieces interlock, whether the top surface grips a tire or lets it slide, and how the material behaves in the cold, which is when brittle plastic finds out it is brittle.
The appeal of the stackable format is precision. You add lift in small increments, you build a ramp instead of a wall, and the same blocks go under a tongue jack or a stabilizer foot when the ground is soft. That flexibility is why most owners end up with a set even if they also carry a one piece ramp leveler. This guide covers what actually separates one set from another, and which sets suit which rigs.
This article contains affiliate links. If you buy through them, we may earn a commission at no extra cost to you. Learn more.
Quick Answer
Which stackable RV leveling blocks should you buy?
- Check the per block weight rating against your heaviest axle load first, since that number, not the price, decides whether a set suits your rig.
- A ten block set of interlocking levelers covers most single and tandem axle trailers, and the blocks double as pads under jacks and stabilizers.
- Heavy fifth wheels and large motorhomes should shop the heavy duty tier, and every set has a published maximum stack height that is worth respecting.
What Separates a Good Block Set From a Frustrating One
Six things decide whether a set will serve you for years or crack in its second season. Brand recognition is not one of them, though the established RV brands do tend to publish the ratings you need.
| What to check | Why it matters | What to look for |
|---|---|---|
| Per block weight rating | Each block carries a share of one wheel’s load, not the whole rig | A published rating comfortably above your heaviest axle load per tire |
| Interlocking design | Loose blocks squirt out sideways as a tire climbs | Positive tabs or pegs that lock layers together in both directions |
| Maximum stack height | Tall stacks get unstable regardless of material | A published limit, commonly around four blocks, and the discipline to respect it |
| Top surface texture | A smooth wet block is a ramp in the wrong direction | Ribbed or textured tops that grip a tire tread |
| Material and UV stability | Sun makes plastic chalky, cold makes it brittle | UV stabilized resin sold specifically for RV leveling, not generic plastic |
| Set size and storage | Ten blocks fill a bag; two blocks fill nothing | Ten as the common useful set, with a carry bag if the seller offers one |
Notice what is missing: lift height per block. Most interlocking designs land around an inch apiece, so the practical differences between sets come from rating and stability rather than from how tall one block is. If you are new to using them, our walkthrough on how to use RV leveling blocks correctly covers the sequence that makes the whole thing easy.
How Many Blocks Do You Need in the Bay?
Ten is the standard set size and it is standard for a reason. A staircase in front of one tire uses several blocks on its own, a tandem axle needs the same treatment for two tires on the low side, and you still want a couple spare for the tongue jack and the stabilizer feet.
Owners who tow tandem axle trailers commonly end up with two sets, one for each side of the trailer, which also means never being short when a site is worse than expected. Motorhome owners with hydraulic leveling often carry blocks purely as pads under the jack feet, and for that a smaller quantity does the job. Whatever the count, weight rating is per block, so buying more blocks does not raise what one stack can carry.
Ratings, honestly read
Manufacturers publish a capacity per block, and the number to compare it against is the load on one tire, not the weight of the whole rig. A rough approach is to take the axle rating from the trailer label and divide by the number of tires on that axle, then leave headroom. If that puts you near the top of a general purpose set’s rating, move up to the heavy duty leveling block tier rather than hoping.
Our Top Picks at a Glance
How we chose: we compared widely available leveling blocks on published per block ratings, how positively the pieces interlock, top surface grip, cold weather reputation, and the themes that repeat in owner feedback across RV forums. Our assessment rests on manufacturer information and that feedback rather than any hands on trial of our own.
🏆 Best Overall
An interlocking ten block set from an established RV brand is the default answer for most trailers. The blocks lock together in a stepped ramp, they stack squarely without shifting as the tire climbs, and they work equally well as pads under a tongue jack or a stabilizer foot on soft ground. Check the published per block rating against your axle load, and pick the version with a carry bag if you value not chasing loose blocks around the bay.

💰 Best Budget Pick
The classic honeycomb style leveler is the set a huge number of owners meet first, and for good reason: it stacks, it interlocks, it goes under jacks, and it is easy to replace one at a time. Owners report the usual plastic caveats, which is to keep the tire centered on the block and avoid stacking past the published height, and within those limits it lasts for seasons. Our Camco leveling blocks review goes deeper on this style.

🏋️ Best for Heavy Rigs
Large fifth wheels, big travel trailers, and Class A motorhomes put loads on one tire that general purpose blocks were not designed for. The heavy duty tier uses thicker sections and publishes higher per block ratings, which is what you are paying for. Confirm the rating against the load on your heaviest single tire, and remember that stacking limits still apply no matter how strong the block is.

Which Format Suits Your Setup?
Stackable blocks are the most flexible option, not the only one. Plenty of owners carry two formats because sites vary more than gear does.
| Your rig and site | What matters most | What usually works |
|---|---|---|
| Single axle trailer, mixed sites | Small increments, low bulk | One ten block interlocking set |
| Tandem axle travel trailer | Supporting both tires on the low side | Two sets, or one set plus a long ramp leveler |
| Fifth wheel or large motorhome | Load per tire and per jack foot | Heavy duty blocks plus solid pads under the jacks |
| Solo setup, hard flat sites | Speed and not getting in and out repeatedly | A curved ramp leveler with blocks as backup |
| Soft ground, grass, gravel | Spreading load so nothing sinks | Blocks or wide pads under every jack and stabilizer |
Whichever you choose, the blocks are only half the job. Chocks go in as soon as side to side leveling is done, before you unhitch and long before the awning comes out.
Two More Picks Worth Having Aboard
The three sets above cover the lifting. These two cover the situations where a stack of blocks is not the fastest or the safest answer.
⏱️ For Fast Solo Setup
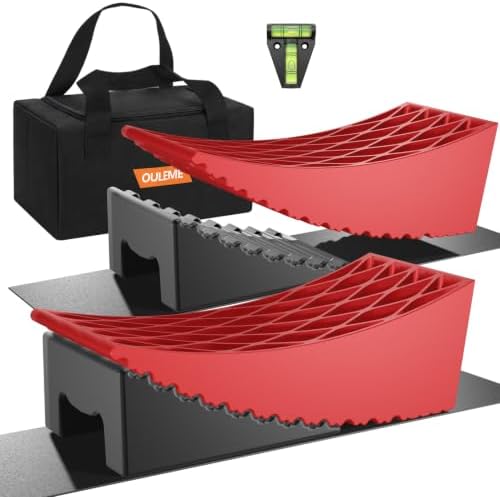
A curved ramp leveler removes the stacking entirely: place it, drive up until the level reads right, drop in the matching chock to lock the position. Owners who arrive after dark and set up alone tend to keep one of these within reach and use the block set for the sites where the ramp will not sit flat. It wants a firm, even surface under its whole length to work properly.
🛑 The Part That Is Not Optional
Once a tire is up on a stack, chocks are what keep it there. A pair of solid wheel chocks front and back is the baseline, and on tandem axles a wedge that spreads between the two tires adds a second layer of security. Buy chocks rated for your rig rather than relying on the lightweight ones bundled with a starter kit, and place them before unhitching.

Getting the Most Life Out of a Set
Leveling blocks fail in predictable ways, and all of them are avoidable. Keep the tire centered on the top block so the load sits over the ribbed structure rather than on an unsupported edge, since overhang is the single most common cause of cracked corners.
Respect the published stack height. If a site needs a taller tower than the maker allows, the answer is a different parking spot, not more blocks. In cold weather, treat plastic gently: drive up slowly, avoid dropping blocks on frozen ground, and check for hairline cracks before building a stack. And rinse grit off before they go back in the bag, because sand between layers stops the interlocking tabs from seating properly.
The one thing they cannot do
Leveling blocks are not lifting devices and neither are stabilizer jacks. Nothing that puts a person under the rig should rest on plastic blocks. Use properly rated jack stands on firm ground, chock the wheels, or have the work done at a shop. This is the line worth being rigid about, because the failure mode is not an inconvenience.
Common Mistakes to Avoid
- Buying on set size instead of rating. Twelve underrated blocks do not equal ten properly rated ones. Capacity is per block.
- Parking with the tire overhanging. Load belongs over the middle of the pad, not on an unsupported edge.
- Stacking past the published limit. Tall towers shift as the tire climbs, and that is how blocks end up shooting out sideways.
- Leaving one tandem tire in the air. Both tires on the raised side need support, or the other one carries double.
- Using lumber as a substitute. Offcuts split, soak up water, and carry no published rating at all.
- Skipping the chocks. A rig on blocks without chocks is a rig relying on friction, and friction is not a plan.
Where to Go From Here
If you are still working out the routine rather than the gear, start with the sequence: level side to side on the blocks, chock, then level front to back with the jack, then stabilize and run the slides. It is laid out step by step in how to use RV leveling blocks correctly, and doing it in that order removes almost all of the frustration.
Two systems care about level more than you might expect. Slide-out mechanisms bind on a twisted frame, covered in RV slide-out problems, and older absorption refrigerators can struggle when the rig sits off level for long stretches, which is where our diagnosis of an RV refrigerator not cooling begins.
Frequently Asked Questions
How many leveling blocks do I need? Ten is the common set size and covers most single or tandem axle trailers, with a few spare for the tongue jack and stabilizers. Tandem axle owners often carry two sets so both tires on the low side can be supported.
How high can I stack RV leveling blocks? Only as high as the maker publishes, commonly around four blocks. Beyond that the stack becomes unstable as the tire climbs, and the right move is to find a flatter site.
What weight can leveling blocks hold? Capacity is published per block and varies widely by set. Compare it against the load on one tire, taken from your axle rating, rather than against the total weight of the rig.
Can I use leveling blocks under stabilizer jacks? Yes, and it is one of their best uses. A block or solid pad spreads the load on grass or gravel and keeps the jack foot out of the mud.
Are plastic blocks safe in cold weather? Quality RV specific blocks are made from UV stabilized resin and are used year round, but plastic gets less forgiving in the cold. Drive up slowly, keep tires centered, and inspect for cracks before stacking.
Do I still need wheel chocks? Always. Blocks set the height and chocks keep the trailer from moving. Place them as soon as side to side leveling is done, and before you unhitch.
The Bottom Line
Buy on published per block rating first, interlocking quality second, and set size third, because a stack is only as good as the weakest block carrying one tire. A ten block interlocking set covers most trailers and doubles as jack pads, while heavy fifth wheels and large motorhomes belong in the heavy duty tier. Keep tires centered, respect the published stack height, chock every time, and never let a block set stand in for a jack stand.