Last updated: August 14, 2026
Most awning damage does not come from the dirt. It comes from the method used to remove it. When owners clean an RV awning and end up with a chalky, streaked, or delaminated canopy, the cause is almost always one of four things: a pressure washer, chlorine bleach, a stiff brush, or rolling the fabric up while it was still wet. A mild cleaner, a soft brush, a thorough rinse, and enough patience to let it dry completely handle nearly every canopy without taking off anything that belongs there.
That is worth stating plainly, because awning fabric is not cheap and is not repairable once the coating is gone. What follows is the sequence in order, a stain chart, the difference between vinyl and woven acrylic, and where the job stops being yours.
This article contains affiliate links. If you buy through them, we may earn a commission at no extra cost to you. Learn more.
Quick Answer
How do you clean an RV awning without damaging it?
- Work on a cloudy, windless day with the awning fully extended, using a mild awning cleaner and a soft brush on an extension pole.
- Apply from the bottom up, keep the fabric wet so nothing dries on it, then rinse until no suds come off at all.
- Let the canopy dry completely before rolling it up, because a damp roll grows the mildew you just spent an afternoon removing.
The Cleaning Sequence, Step by Step
Follow these in order. The sequence matters more than the product, because most reported damage happens at the beginning (too much pressure) or at the end (rolling up wet).
- Pick a cloudy, calm day. Sun bakes cleaner onto the fabric before it can work, and wind turns an extended awning into a sail.
- Roll it fully out and support the arms. Full extension holds the fabric flat and evenly tensioned. A partly extended canopy flexes while you brush, which works seams loose.
- Sweep the loose material off dry. Leaves, needles, and dust come off far more easily before water turns them into paste.
- Rinse both sides at low pressure. A garden hose is enough. Wet the underside first, so cleaner cannot soak into dry fabric in one spot.
- Apply cleaner from the bottom up. Working upward keeps runs from streaking through dry fabric below. Cover one section at a time.
- Let it dwell, but never let it dry. Follow the label and mist the area if it starts drying. Dried cleaner leaves pale blotches owners mistake for bleaching.
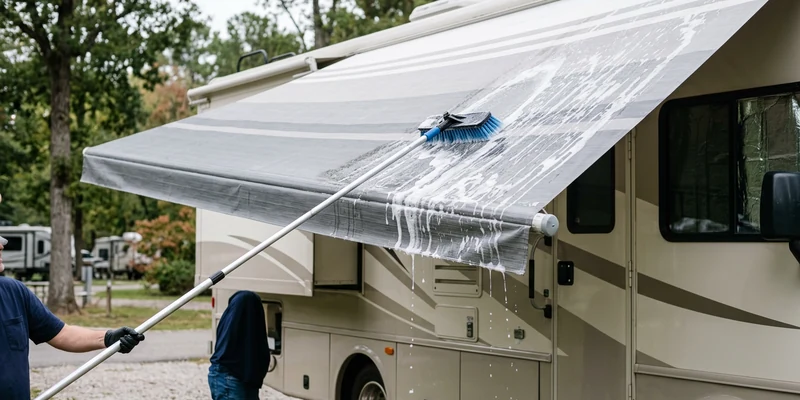
- Brush gently with soft bristles. Straight overlapping strokes, light pressure, no circular scrubbing. If a spot resists, add cleaner and wait.
- Rinse until the suds stop. Residue attracts dirt and dulls the coating. When the runoff is clear and foam free, you are done.
- Roll halfway in and do the hidden band. The strip wrapped around the roller never gets touched otherwise, and it is where mildew starts.
- Dry completely before rolling up. Both faces, both edges, and the roller tube. If the weather turns, extend it again at the next opportunity.
🧴 The cleaner that does the work
A concentrated RV awning cleaner formulated for canopy fabric and safe on both vinyl and woven acrylic. Dilute it for routine washing, mix it stronger for a neglected canopy. Check that the label names your fabric, since household outdoor cleaners are often far more aggressive than awning material tolerates.

What the Stain Is Telling You
Not every mark responds to the same treatment, and a few are not dirt at all. Find the problem on the left; the right column is the approach owners and RV technicians point to.
| What you see | Where it comes from | What works |
|---|---|---|
| Black or gray mildew spots | Fabric rolled up damp, or humid storage | A mildew stain remover made for awning fabric, using dwell time rather than pressure |
| Sticky tree sap | Parking under pines, maples, or any sap heavy tree | Loosen with a fabric safe solvent on the spot, then wash the whole panel so it does not shadow |
| Bird droppings | Perches, power lines, and roof edges above the site | Soak with water so it lifts instead of smearing, then clean normally. Never scrape it dry |
| Black streaks near the rail | Rain carrying oxidized sealant and roof grime down the fabric | An RV black streak remover on that band, then a full rinse. Cleaning the roof edge stops it recurring |
| Chalky, dull vinyl | UV breakdown of the coating, often sped up by harsh cleaners | Gentle cleaning only, since strong products accelerate exactly what you are trying to stop |
| Gray road film and soot | Highway travel with the awning stowed, plus campfire smoke | Routine cleaner and a soft brush, bottom to top in overlapping strokes |
| Moss or grime in the rail | Water sitting in the channel where fabric meets the rig | A soft brush and a rinse in the channel, without scouring the painted or anodized surface |
| Vinyl sticking to itself | Coating breakdown from heat, trapped dirt, or solvent damage | Wash gently and dry fully. Once the surfaces bond and tear on opening, the fabric is finished |
Mildew deserves a note. On vinyl it is not eating the fabric, it is feeding on the dirt film on top of it, which is why a proper wash removes so much of it. On acrylic it settles into the weave and needs a product made for that material.
🧽 For spots a normal wash leaves behind
A mildew stain remover made for awning and marine fabric, which lifts staining without the damage household bleach causes. Use it as a spot treatment, follow the dwell time, and rinse hard. Confirm the label covers your fabric, since vinyl and acrylic versions differ.

Vinyl and Acrylic Are Not Cleaned the Same Way
Work out which fabric you have before buying anything, because the two materials fail in opposite directions. Vinyl is a coated, non porous sheet. Woven acrylic is a breathable cloth.
Vinyl canopies
Vinyl feels smooth and slightly rubbery and blocks light almost completely. Its surface coating does the work: it repels water, resists UV, and keeps the material flexible. Harsh degreasers and undiluted bleach attack that coating rather than the dirt, and once it goes chalky it does not come back.
Woven acrylic canopies
Acrylic looks like canvas and lets a little light through. Its water resistance comes from a factory finish in the weave, not a surface film, so strong cleaners strip it and the awning starts wetting through. That is fixable: re-treat with a protectant once it is completely dry. Manufacturer information for acrylic points toward mild soap, plenty of water, and periodic re-proofing.
🪥 Reach without climbing
A soft bristle RV wash brush on a telescoping extension pole, the single tool that changes this job the most. It keeps you on the ground and allows long even strokes across the full width. Check the pole length against your awning height and the thread type, since heads and poles are not universally compatible.

What Never Touches an Awning
None of these are borderline calls. Every one of them shows up repeatedly in owner forum threads about ruined canopies.
- A pressure washer. Even at a distance it drives water through the coating, lifts stitching, and can separate a welded seam.
- Undiluted chlorine bleach, especially on acrylic. It attacks the weave, strips the repellent finish, and affects stitching. Bleach based mold sprays count too.
- A stiff or abrasive brush. Deck brushes and scouring pads scratch vinyl coating and fray acrylic fibers.
- Aggressive degreasers and solvent cleaners. Products made for engine bays or wheels are far stronger than any canopy tolerates.
- Rolling it up wet. This creates next season’s mildew problem, and avoiding it is free.
- Abrasive cleaners in the rail. Scouring powders mark the aluminum channel and remove the finish that resists corrosion.
Working Safely at Height
An awning sits at exactly the wrong height: too high to reach comfortably, too low to feel dangerous. Most injuries owners describe come from a ladder on soft ground or from reaching sideways off the top step.
Do not work alone if you can avoid it, and never in wind, because an extended awning moves and pushes back. Set a ladder on firm level ground, keep your hips inside the rails, and move it rather than stretching. A telescoping pole removes most of the need for a ladder, and long strokes from the ground are gentler on the fabric than scrubbing from above.
How Often, and How to Keep It Clean Longer
Two full cleanings a year suits most owners: one coming out of storage, one before it goes back. Add a wash after any trip that leaves visible film. Frequent gentle cleaning beats occasional heavy cleaning, because the dirt film is what mildew feeds on.
Habits matter more than the schedule. Never stow a wet canopy, and if you travel with it damp, extend it to dry at the next stop. Bring it in when wind or heavy rain is forecast, since water pooling in a sagging canopy bends arms. On acrylic, re-apply protectant whenever water stops beading.
💧 Restore the water repellency
A fabric protectant and water repellent spray for awning and outdoor canopy fabric, which puts the shedding finish back after a deep clean. It matters most on woven acrylic, where repellency lives in the weave. Apply only to fabric that is completely clean and dry, and check the product lists your fabric type.

Cleaning doubles as an inspection. With the canopy lit from behind, look for pinholes, thin patches, fraying at the roller edge, and stitching that has opened. Catching a tear early is the difference between a patch and a new canopy, and RV awning repair explains each symptom. The patch options are compared in RV awning repair tape and patch kits.
Where This Stops Being a DIY Job
Washing an awning is owner territory. These situations are not, and pushing through them turns a cleaning afternoon into a fabric replacement.
- Fabric that tears while you brush it. If light pressure opens a hole, the material is UV degraded throughout. Stop and price a new canopy.
- Split or opening seams. Seams carry the load across the canopy, and washing lengthens the split. That needs proper repair or replacement.
- Water inside the sidewall. Staining, soft spots, or bubbling paint below the rail means water is getting past the rail sealant. That is a leak diagnosis, and it worsens quietly.
- An electric awning that binds or will not move. Motor, gearbox, and torsion assembly work involves stored spring tension that can injure you badly.
- Height you are not comfortable with. Tall fifth wheels and Class A coaches put the roller above ladder comfort. A mobile tech is cheaper than a fall.
Common Mistakes to Avoid
- Reaching for the pressure washer. The fastest way to destroy a canopy that had years left in it.
- Cleaning in full sun. The cleaner dries before it works, and the blotches look permanent.
- Working top to bottom. Runs streak through the dry fabric below and shadow after rinsing.
- Scrubbing harder instead of waiting longer. Dwell time removes stains. Pressure removes coating.
- Forgetting the wrapped band. The strip on the roller only gets cleaned if you roll halfway in.
- Rolling up before it is dry. Every mildew problem next spring traces back to this one.
Where to Go From Here
If the wash revealed damage rather than dirt, start with the symptom based diagnosis in RV awning repair, which covers tears, sag, and arms that stick. Small holes are usually a tape or patch job, while anything along a seam points elsewhere.
If the fabric is thin, brittle, or chalky throughout, new fabric on the existing hardware is the answer, laid out in how to replace RV awning fabric. When the hardware is equally tired, replacing the whole awning is the wider project, and stopping condensation and mold tackles the damp storage behind most mildew.
Frequently Asked Questions
What is the best thing to clean an RV awning with? A mild cleaner made for awning fabric, a soft bristle brush on an extension pole, and a garden hose. Work bottom to top, keep the fabric wet while the cleaner does its job, and rinse until the runoff is free of suds.
Can you use bleach on an RV awning? Household chlorine bleach is a poor choice, especially on woven acrylic, where it strips the water repellent finish and attacks fibers and stitching. A mildew remover made for awning fabric does the same job without that damage.
Can I pressure wash my RV awning? No. Concentrated pressure forces water through the coating, lifts stitching, and can separate seams. A standard garden hose gives all the rinsing pressure an awning needs.
How do I remove black streaks from an awning? Those streaks are oxidized sealant and roof grime washed down by rain. Use an RV black streak remover on that band followed by a full rinse, and clean the roof edge above so they stop coming back.
How often should an RV awning be cleaned? Twice a year suits most owners, once out of storage and once before it goes back, plus a wash after any trip that leaves visible film or after parking under sap heavy trees.
Why is my vinyl awning sticky when it unrolls? The surface coating is breaking down, usually from heat, trapped dirt, or a cleaner that was too strong. Gentle washing and complete drying slow it, but once the surfaces bond and tear on opening, the fabric is at the end of its life.
The Bottom Line
Use a cloudy day, low water pressure, a mild awning cleaner, and a soft brush on a pole, working bottom to top so nothing streaks or dries on the fabric. Rinse until the runoff is clear, clean the band that normally stays wrapped on the roller, then let the canopy dry completely before it goes away. Skip the pressure washer, the bleach, and the stiff brush entirely, and hand split seams, torn fabric, water in the sidewall, and stuck electric awnings to a technician.