Last updated: August 14, 2026
Most of the time, the RV awning fix you need has little to do with the fabric. Awnings fail on hardware and habits: water standing on a canopy that was set level, a gust catching an unsupported span, grit in dry arms, screws working loose, and a torsion spring that has lost tension. The tear you are looking at is usually the last step in that chain.
So this guide runs in a technician’s order: symptoms, then the checks that cost nothing, then repairs in increasing order of effort, from tape to new fabric to a complete unit. It also flags the hazard that injures owners every season, the preloaded spring inside the roller tube.
This article contains affiliate links. If you buy through them, we may earn a commission at no extra cost to you. Learn more.
Quick Answer
How do you fix an RV awning?
- Start free: clean and lubricate the arms and rail, retighten every fastener, pitch the canopy so water drains off one corner, and never roll the fabric up wet.
- Repair by size: tape for pinholes, a patch kit for larger damage, new fabric once a tear reaches a seam or the roller edge, a complete unit when the hardware is tired too.
- The roller tube holds a preloaded torsion spring that can injure you. Work with two people, follow the maker’s instructions for relieving and locking that tension, and call an RV technician if anything is unclear.
Symptoms, Causes, and Actions at a Glance
Find what your awning is doing on the left, then work the right column first.
| What you see | What it usually means | What to do first |
|---|---|---|
| Small hole or short tear | UV thinned the vinyl, flexing finished it | Clean, dry, tape both sides before it spreads |
| Long tear along the roller | A loaded canopy, or months of damp storage | Patch to stop the run, then plan on new fabric |
| Fabric sags in the middle | Stretched fabric or arms at unequal height | Reset arm height, check the tube for a bow |
| Water stands on the canopy | Both arms set level, so nothing drains | Lower one arm so water runs off a corner |
| Fabric torn at the roller tube | Pooled water or a gust pulled at the edge | Replace the fabric; edge tears do not hold a patch |
| Fabric pulled out of the wall rail | The polycord slipped, or the rail is spread | Inspect the rail first, then refeed the cord |
| Arm sticks or will not roll fully back | Grit, dry pivots, or a weak spring | Clean and lubricate; spring work is technician territory |
| Electric awning hums, nothing moves | Low voltage, stalled motor, or a bind | Check fuse and battery voltage, then look for a jam |
| Unrolls while driving | Travel lock not engaged, or a worn latch | Confirm the lock every trip, stop until it holds |
| Chalky, faded, or dark speckled | UV breakdown, or mildew from damp storage | Clean and dry fully; tacky vinyl is near its end |
| Screws loose at the wall bracket | Vibration and wind loads on old sealant | Stop using it until mounting and sealant are checked |
| Loud flapping in a breeze | An unsupported span flexing at its edges | Fit anti flap clamps, roll it in when wind builds |
Start With the Checks That Cost Nothing
Run these five before you buy anything. They resolve awning complaints more often than parts replacement does.
- Clean the rail and the arms. Grime, sap, and pollen collect in the wall rail and the sliders, and that grit is what makes an awning feel stiff.
- Lubricate with the right product. Makers usually specify a dry lubricant and warn against oily sprays that hold dust, and some finishes call for a silicone free product. Never lubricate the fabric.
- Retighten every fastener. Rail screws, brackets, arm hardware. Check the sealant too, because a loose screw has usually been letting water in behind it.
- Set the pitch. An awning rolled out level is a shallow pool waiting for rain. Lower one arm so it drains off a corner, every time.
- Confirm the travel lock, and dry the fabric. Check the latch engages before every drive, and never store the canopy rolled up wet.
Those five are also the whole preventive routine. Our walkthrough on cleaning an RV awning without damage covers the wash side, including why pressure washers do more harm than the dirt did.
Repairs in Increasing Order of Effort
Damage sorts into four levels, and picking the right one saves rework. Tape stops small damage, patches carry medium damage, and anything reaching a seam or the roller edge is asking for new fabric.
Level one: tape for pinholes and short tears
Clear vinyl awning tape is the most effective thing on this page, provided you use it early. Applied to both sides it stops a tear from running, and success is mostly preparation: clean, fully dry fabric with none of the mildew film that stops adhesive bonding. Round the corners of the piece you cut, since square corners lift first.
🩹 For pinholes and tears you caught early
A roll of clear vinyl awning repair tape, UV resistant and wide enough to overlap the damage on both sides. Keep one aboard rather than buying after the fact.

Level two: a patch kit for larger damage
Once damage is bigger than tape can bridge, an adhesive patch kit is next. Kits come in vinyl and fabric versions, and matching the kit to your canopy matters, since an adhesive made for coated vinyl behaves differently on woven acrylic. Patch both sides and give the adhesive its full cure time before rolling up.
🧰 For a tear that has already spread
An RV awning patch and repair kit with adhesive, sold in versions for vinyl and for woven fabric. Check your material first, and see our roundup of tape and patch kits.

Clean it before you stick anything to it
Every adhesive repair depends on a clean, dry surface. Use a cleaner intended for awning material, work in the shade with a soft brush, and rinse well. Mildew staining sits in the surface rather than on it, so a product made to lift it does more than dish soap without stripping the coating.
🧴 Before any patch, and twice a season anyway
An RV awning cleaner and mildew stain remover concentrate, used with a soft brush and plenty of rinse water. Dark speckled staining means the canopy was rolled up damp.

Level three and four: new fabric, or a new awning
New fabric is the call once a tear crosses a seam or the vinyl has gone chalky overall, covered in how to replace RV awning fabric. A complete unit is the call when arms are bent, the tube is bowed, or the spring no longer retracts the awning, which is how to replace an RV awning yourself. Both involve the spring.
The Spring Inside the Roller Tube Is Not a Detail
A manual awning retracts because a torsion spring inside the roller tube is wound under preload. That spring holds real energy at all times, including when the awning looks relaxed. If an end cap comes off or the tube slips out of a bracket with tension still in it, the tube can spin or launch, and the injuries that follow are serious.
Treat it accordingly. Work with two people so nobody holds a loaded tube alone, keep hands and face clear of the tube ends, and follow the manufacturer’s instructions for relieving and locking the tension before anything comes apart. Dry, calm day, ladders on firm level ground, never alone and never in wind. If the instructions are missing or do not match your mechanism, call an RV technician.
Water Pooling and Why Pitch Matters
Standing water is the most destructive thing that happens to an awning, and it is preventable. Water is heavy, the canopy holds more of it than people expect, and the load stretches fabric, pulls at the roller edge, and levers on the wall mounting until something gives. The fix is pitch: set one arm lower so rain runs off a corner, as part of deployment rather than as a reaction to the forecast. Push an existing pocket up from the side with a broom handle, never from underneath. A canopy that sags when correctly pitched has stretched, or the roller has bowed.
Wind Damage and the Hardware That Helps
An extended awning is a sail bolted to a sidewall, and the loads it puts into the mounting rail are far higher than the fabric will ever see. The rule owners repeat, and manufacturers print, is blunt: when the wind comes up, the awning goes in. What hardware helps with is the low level flapping that fatigues fabric and loosens screws over a season of ordinary breezes.
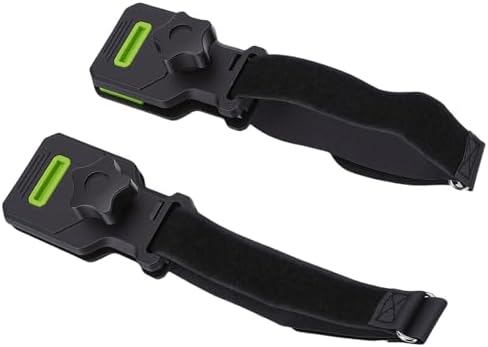
💨 For flapping in ordinary breezes
A pair of RV awning de-flapper clamps that hold the fabric against the arms and stop the flutter that works fasteners loose. They do nothing for real wind, which is what the retract handle is for.
Arms That Stick, Bind, or Will Not Slide
A stiff arm is nearly always dirt, corrosion, or missing lubrication, and rarely a broken part. Wash the arms, work the sliders through their travel, and lubricate the points your manufacturer names with the product it specifies. Some things genuinely are damage: a bent arm, a gouged slider, or a loose rivet changes the geometry, and forcing an awning that binds is how a bent arm becomes a torn canopy. If the other big moving assembly on your rig sticks too, see RV slide-out problems.
Replacing the Fabric, or the Whole Unit
The honest test is whether the hardware is healthy. If the arms move properly, the tube is straight, and the spring still retracts the awning with authority, fabric only is the faster job. If two or more of those are questionable, a complete unit takes less total effort and leaves you with a fresh spring, hardware, and canopy on the same day. A spread rail or screws pulled through the sidewall is different again: the wall gets inspected first.
🧵 When the canopy is finished but the hardware is not
Replacement vinyl RV patio awning fabric, ordered to fit your existing roller tube rather than the advertised awning size. Confirm the polycord diameter with the supplier first.

Electric Awnings: What You Can Check
On a powered awning the 12 volt side is owner territory and the motor is not. Start with the fuse, the switch, and battery voltage under load, since a healthy 12 volt battery normally reads around 12.6 to 12.8 volts at rest and a motor that hums or crawls is often reporting low voltage. Then look for a mechanical reason it is straining. What is not yours is the motor internals, the limit switches, and the harness behind the sidewall. Disconnect power before working near a powered awning.
Where This Stops Being a DIY Job
Plenty of awning work is approachable. These situations are not.
- Torsion spring tension. Relieving or resetting preload carries real injury risk. Without two competent people and clear instructions, it is a technician job.
- Working at height. This happens on ladders, often at both ends at once. Never alone, never in wind, never on soft ground.
- Motor internals and wiring. Limit switches, motor teardown, and harness repairs belong to an RV technician.
- Damage to the sidewall. Pulled screws, a spread rail, or delamination means the structure needs assessment first.
- Water in the structure. Stains, soft spots, or a musty smell near the rail mean water got behind the mounting, which connects to condensation and mold.
Common Mistakes to Avoid
- Rolling the awning up wet. This causes more fabric failures than any other habit, and mildew staining never fully cleans out.
- Setting both arms level. Level looks tidy and turns the canopy into a basin.
- Leaving it out overnight or unattended. Weather arrives when nobody is watching, and a wind failure takes mounting hardware with it.
- Taping over dirty or damp fabric. Adhesive repairs fail at the preparation stage far more often than at the product stage.
- Pressure washing the canopy. High pressure drives water into seams and strips coatings.
- Touching the spring without instructions or a helper. Everything else here can be redone. That one cannot.
Where to Go From Here
If the fabric is the only problem, go to how to replace RV awning fabric. If the hardware is tired too, how to replace an RV awning yourself covers the complete swap. If the canopy simply looks bad, start with cleaning it without damage, and keep awning repair tape aboard as cheap insurance. A healthy awning also earns its keep in heat, which is part of keeping an RV cool in summer.
Frequently Asked Questions
Can you repair an RV awning yourself? Cleaning, lubricating, retightening hardware, taping small tears, and patching larger ones are realistic owner jobs. The torsion spring, motor internals, and sidewall damage belong with an RV technician.
What is the best way to fix a small tear in an RV awning? Clean and dry the area, then apply clear vinyl awning tape to both sides with generous overlap and rounded corners. Doing it early keeps the tear from running.
Why does water pool on my RV awning? Because it was set level instead of pitched. Lower one arm so rain drains off a corner. If it still sags, the fabric has stretched or the tube has bowed.
How long does RV awning fabric last? Owners report a wide range depending on sun exposure, storage, and whether the canopy was ever rolled up wet.
Can you replace just the fabric instead of the whole awning? Yes, if the arms, tube, and spring are sound. Once two or more are questionable, a complete unit is the better use of a day. See the fabric guide.
Is it safe to leave an RV awning out overnight? Manufacturers generally advise against it. A failure at night usually damages the mounting rail and the sidewall too.
The Bottom Line
Work from free to expensive: clean and lubricate the arms and rail, retighten every fastener, pitch the canopy so it drains, and never roll it up wet. Then repair by size, tape for small tears, a patch kit for larger ones, new fabric once damage reaches a seam or the roller edge, and a complete unit when the hardware is tired too. The hard limit is the preloaded torsion spring, which needs two people, the manufacturer’s procedure, and a willingness to call an RV technician instead.