Last updated: August 14, 2026
You turn on the hot tap after a few weeks parked and the bathroom fills with the smell of rotten eggs. The cold side is fine. Nothing looks wrong, nothing is leaking, and the water heater is working exactly as it should. That combination is the classic signature of an RV water heater smell, and it has a specific, well understood cause.
Sulfur odor in hot water comes from hydrogen sulfide gas, produced when sulfate reducing bacteria that occur naturally in many water supplies settle into a warm tank and react with the sacrificial anode rod. The rod is doing its job, protecting the steel tank by corroding instead of it, and the byproduct of that chemistry in the presence of those bacteria is the smell. Which is why the fix is not an air freshener. It is flushing the tank, dealing with the anode, and sanitizing the water system that feeds it.
This article contains affiliate links. If you buy through them, we may earn a commission at no extra cost to you. Learn more.
Quick Answer
Why does RV hot water smell like sulfur?
- Hydrogen sulfide gas, produced when bacteria present in the water supply react with the magnesium anode rod inside a warm tank. Hot side only is the giveaway.
- The fix: turn the heater off and let it cool, drain and flush the tank, inspect the anode rod and replace it if it is heavily consumed, then sanitize the fresh water system.
- If the smell keeps coming back, owners commonly switch from a magnesium rod to an aluminum zinc alloy rod, which many report reduces the reaction.
Symptoms, Causes, and Actions at a Glance
Which taps smell, and when, narrows this down quickly. Run the cold tap first and compare before you touch a wrench.
| What you notice | What it usually means | What to do |
|---|---|---|
| Rotten egg smell on the hot side only | Hydrogen sulfide from the tank, anode plus bacteria | Flush the tank, inspect the anode, sanitize the system |
| Smell on hot and cold | The fresh water source or fresh tank, not the heater | Sanitize the fresh water system and review your source |
| Smell appears after weeks of sitting | Stagnant water in a warm tank | Drain the heater during storage, flush before each trip |
| Cloudy water and grit in the strainer | Sediment and scale accumulating in the tank | Flush with a tank rinse wand, more often on hard water |
| Anode rod down to the core wire | Rod consumed, tank losing its protection | Replace the rod now, not next season |
| Aluminum tank, no rod fitted | Atwood style aluminum tanks use a plastic drain plug | Do not add a rod; treat the water supply instead |
| Smell plus discolored water | Heavy scale, or an unusual water source | Flush, then filter the incoming water |
Know Which Tank You Have Before You Start
RV water heaters come in two broad families and the difference decides your whole approach. Suburban units use a steel tank with a porcelain lining and a sacrificial anode rod threaded into the side, which doubles as the drain plug. Atwood units, now sold under Dometic, use an aluminum tank clad in steel and are designed without an anode rod; they drain through a plastic plug.
This matters twice over. Fitting a rod to an aluminum tank is not the upgrade it looks like, and if you have an aluminum tank with sulfur odor, the cause sits in the incoming water rather than in a rod that was never there. Check the label on the outside access panel or the model number in your manual before you buy any part.
What the anode rod is actually for
In a steel tank, the rod is a block of more reactive metal that corrodes preferentially and spares the tank. A magnesium rod protects strongly and is also the rod most associated with sulfur odor. Aluminum zinc alloy rods are the common alternative, and owners with recurring smell frequently report an improvement after switching. Either way, a rod that is down to the thin steel core wire is finished and needs replacing.
Flushing the Tank and Replacing the Anode
This is a standard owner maintenance job on a Suburban style heater, and it is where the smell usually goes away. Give yourself a couple of hours, most of it waiting for the tank to cool.
- Turn the water heater off completely. Both the electric element switch and the gas, at the panel and at the appliance.
- Let it cool down. Give it several hours, or overnight. A tank at operating temperature will scald you the moment the plug moves.
- Cut the water supply and release pressure. Switch off the water pump, disconnect city water, then open a hot faucet inside until it stops flowing.
- Open the pressure relief valve. Lifting the lever lets air in so the tank will actually drain instead of gurgling.
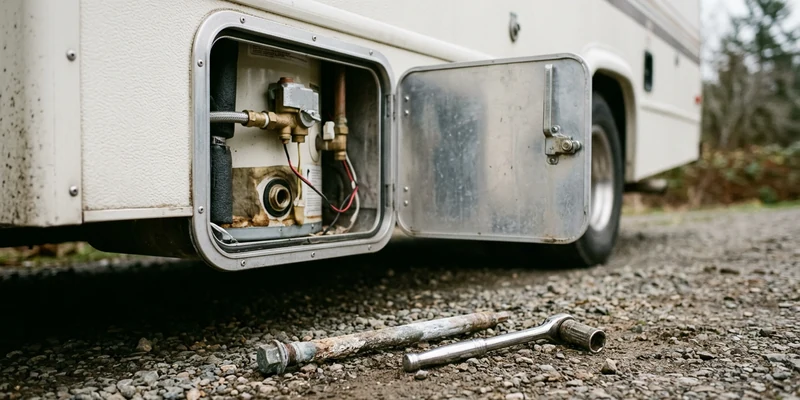
- Remove the anode rod or drain plug. On Suburban tanks the anode is the drain plug, and a socket around 1 and 1/16 inches is the common size. Stand clear of the outflow.
- Flush the tank out. Feed a water heater rinse wand through the opening and spray in every direction until the water runs clear and no more sediment or scale comes out.
- Inspect the rod. Compare it to a new one. Heavily pitted, thinned to a fraction of its original diameter, or exposing the core wire all mean replace it.
- Consider a vinegar soak. For a persistent smell, many owners fill the tank with a diluted white vinegar solution, leave it for several hours, then drain and flush it thoroughly. Check your manual first, since some manufacturers specify their own procedure.
- Fit the new rod with fresh tape. Wrap the threads with plumbing tape and tighten it snug. Overtightening damages the port; leaks are usually a tape problem, not a torque problem.
- Refill before you power anything on. Close the relief valve, restore water, and run a hot tap until it flows steadily with no air. Never switch an electric element on with an empty tank, since a dry element burns out in seconds.
- Check for leaks, then restore heat. Look around the rod and the relief valve with a dry paper towel before turning the heater back on.
The rod itself is the part to have on hand, and it needs to match your heater’s thread size and length.

The rinse wand is what makes the flush actually work, since gravity alone leaves most of the sediment sitting in the bottom of the tank.

And the socket is the tool people discover they do not own halfway through the job, usually in the dark.

Sanitize the Whole System, Not Just the Heater
If the smell is on the cold side too, the heater is innocent. The bacteria involved live in water, so they arrive through your fill hose, sit in the fresh tank, and repopulate a freshly flushed water heater within days. Cleaning one part of the loop is why some owners repeat this job every month.
The standard approach is a diluted household bleach solution run through the fresh tank and every line until you smell it at each tap, left to stand for several hours, then flushed out until the chlorine smell is gone. A commonly published ratio is around a quarter cup of household bleach per 15 gallons of fresh tank capacity, though your owner manual is the authority for your rig. The full routine is covered in our guide to sanitizing an RV fresh water tank.
Then keep the bad water out
Sulfur smell often follows a specific water source, and owners who move between parks notice it changes with the fill point. A filter on the incoming hose does not change the chemistry inside the tank, but it does keep sediment and a lot of taste and odor compounds out of the system, which is why full timers run one permanently. Our comparison of RV water filter systems covers what the different stages actually address.
Where the Line Is: What Not to Touch
Draining, flushing, and swapping an anode rod are owner level tasks. Several things around the same appliance are not, and the RV Industry Association and every manufacturer manual agree on this.
- Propane and burner work. Gas lines, regulators, orifices, and burner adjustment belong to a certified RV technician. If the heater is not lighting, smells of gas, or burns with an unusual flame, shut the propane off at the tank and call one.
- The 120 volt side. Element replacement, thermostats, wiring, and anything at the breaker is certified technician work in most rigs, and it is not a place to improvise.
- A leaking tank. Water seeping from the tank body rather than a fitting means the tank is done. They are not repairable and the appliance gets replaced.
- A relief valve that weeps constantly. That can indicate a pressure or thermostat problem rather than a bad valve, and it should be diagnosed rather than plugged.
Because this appliance burns propane, keep a working carbon monoxide alarm in the coach and test it at the start of every season. That advice applies to every combustion appliance on board, the furnace and cooktop included.
Keeping the Smell From Coming Back
Odor returns when warm water sits still. Drain the water heater whenever the rig is stored for more than a couple of weeks, and drain the fresh tank rather than leaving it half full. Before a trip, flush both and refill with fresh water.
Inspect the anode rod at least once a season, and more often on hard water, replacing it when it is roughly three quarters consumed rather than waiting for it to disappear. Run the water heater hot enough for normal use rather than at the lowest possible setting, since lukewarm storage is what bacteria like best. Sanitize the fresh system at the start of each season, and keep a filter on the fill hose. The same stagnation logic explains a lot of other RV odors, including a gray tank that smells, and it pairs with basic water pump maintenance to keep the whole fresh side pleasant.
Common Mistakes to Avoid
- Removing the anode from a hot tank. Scalding water under pressure. Kill the heat and wait for it to cool, every time.
- Skipping the pressure relief lever. Without an air path, the tank drains slowly or not at all.
- Powering an electric element with an empty tank. The element burns out almost instantly. Fill and purge air first.
- Adding an anode rod to an aluminum tank. Those tanks are designed without one. The rod is not a universal upgrade.
- Flushing only the heater. If the fresh tank and lines are not sanitized, the smell repopulates within days.
- Overtightening the rod. Snug with fresh plumbing tape seals it. Force damages the port and turns a maintenance job into a repair.
Frequently Asked Questions
Why does only my hot water smell like sulfur? Because the reaction happens inside the water heater, where bacteria from the water supply meet a warm environment and the sacrificial anode rod. Cold water bypasses the tank entirely, so it comes through unaffected.
Will replacing the anode rod fix the smell? Often, especially combined with a full flush and a system sanitize. If the odor keeps returning with a magnesium rod, owners commonly switch to an aluminum zinc alloy rod and report better results.
How often should I replace the anode rod? Inspect it at least once a season and replace it when roughly three quarters of the material is gone. Hard water consumes rods considerably faster.
Can I use vinegar in my RV water heater? Many owners fill the tank with a diluted white vinegar solution, let it stand for several hours, then drain and flush thoroughly. Check your manual first, since some manufacturers specify a particular cleaning procedure.
My Atwood heater has no anode rod. Why does it still smell? Aluminum tanks are built without one, so the odor is coming in with the water rather than being generated in the tank. Sanitize the fresh water system and look at your fill source and filtration.
Do I need to drain the water heater for storage? Yes, and it solves two problems at once. Standing warm water is what breeds the odor, and a drained tank is also one less thing to freeze.
The Bottom Line
Sulfur smell on the hot side is hydrogen sulfide from bacteria in the water supply reacting with the anode rod in a warm tank. Turn the heater off, let it cool, drain and flush with a rinse wand, replace a heavily consumed rod, and sanitize the fresh water system so the bacteria do not simply move back in. Leave propane and 120 volt work to a certified RV technician, and keep the tank drained whenever the rig sits.